Marlin firmware has long been the industry standard for 3D Printers. It’s reliable, open source and actively maintained, with a massive community of contributors behind it. In order to compile Marlin firmware though, we need to familiarize ourselves with a programming environment.
Most tutorials use VSCode and a PlatformIO plugin, and there’s nothing wrong with that approach, but ambiguous errors are almost guaranteed within Microsoft’s Visual Studio. In this guide, we’ll compile Marlin firmware from the command line, bypassing the extra software and keeping this as simple as possible.
Prerequisites
Before we can compile Marlin firmware, we must first install two software packages, Python and PlatformIO.
1. Python
Python is a high level, general purpose programming language. It comes pre-installed on most operating systems with the exception of Windows.
Our firmware compiler, PlatformIO, is built on top of Python. As such, we’ll download and install the latest version before moving forward.
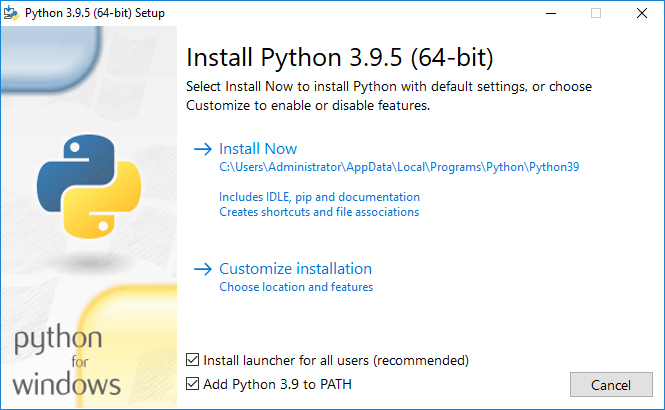
Launching the Python Windows Installer will bring us to the following screen. Make sure “Add Python 3.9 to PATH” is checked at the bottom, then click Install Now to start the setup.
2. PlatformIO
PlatformIO is a cross-platform, cross-architecture, multi-framework IDE for developing embedded systems. Simply put, you can compile the same code for different devices without much hassle.
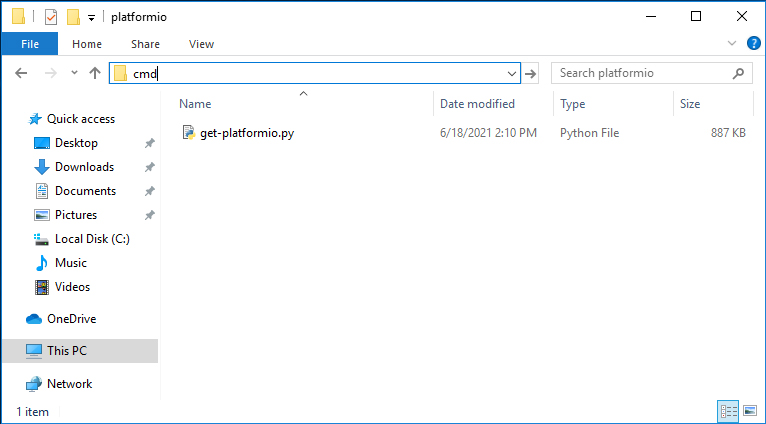
Start by creating a new folder on your Windows PC, we’ll call this “platformio”. Download the PlatformIO installer script from the following link, then place this file inside of our new directory.
From the “platformio” folder, click the file bar at the top and type in “cmd”. Press enter and this will open a command prompt in the current directory.
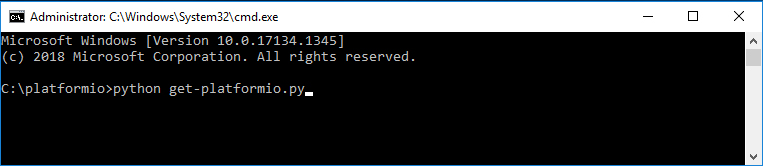
At the command prompt, run the PlatformIO installer script we downloaded by typing “python get-platformio.py” and press enter. This will take around 30 seconds to complete.
With PlatformIO now installed, the last step is to add it to our environmental PATH variable. This allows Windows to recognize the application by name, know where the files are located and run it from anywhere.
- Open Control Panel by pressing Windows Key + R, then type “control”
- Go to System -> Advanced System Settings
- Under the Advanced tab, click the Environmental Variables button
- Double click the “Path” variable under System Variables
Add a new entry to the list for PlatformIO and specify the path where it was installed. This should be “C:\Users\username\.platformio\penv\Scripts”, replacing “username” with your Window’s account name. Press OK to save the changes.

Download Marlin Firmware
With our prerequisites done, we’ll grab the latest release of Marlin firmware. Either clone the source code from their official Github page, or download the compressed ZIP archive below.
Extracting this archive will create a “Marlin-2.0.x” folder, containing the files we need to compile our firmware.
Keep in mind, the default configurations are just a generic example, it’s not setup to work with any particular 3D Printer. To ensure the firmware runs as expected, we’ll update the configuration files to match our machine in the next step.
Configure Marlin Firmware
Marlin has a massive library of ready made configuration files, supporting hundreds of different 3D Printers. Based on the machine’s original firmware, these are templates that can be used as-is or customized to your preference.
When manufacturers violate the GPL license and don’t publish their modified source code (looking at you Creality), this can be a godsend.
Download and extract this archive. In the ‘config/examples’ directory, we’ll find a list of folders belonging to different manufacturers. There is a collection of sub-folders inside of them, one for each 3D Printer that company has released. In some cases, there is even a third tier of folders for various control boards.
Locate the folder for your 3D Printer and copy all of the files from inside of it. The primary two are Configuration.h and Configuration_adv.h, but most will have a _Bootscreen.h and _Statusscreen.h file as well.
In my case, I have a Creality Ender 3 with a BIGTREETECH SKR Mini E3 2.0 board installed.

Take the files that we’ve copied and place them in the ‘Marlin-2.0.x/Marlin’ folder from the previous step. If files with the same name exist in that directory, overwrite them with the new configurations.
Should you wish to make changes before compiling the firmware, now is the chance to do so. Configuration.h file holds the common settings, and despite the file extension, it can be modified with a standard text editor.
Compile Marlin Firmware
Before we can compile Marlin firmware, we need to know what control board is in our 3D Printer. The firmware itself is hardware agnostic, but when compiling it into a binary file, we’re building it for a specific microcontroller.
The full list of boards can be found in our Marlin firmware folder. Navigate to ‘Marlin-2.0.x/src/core/boards.h’ and open it in a text editor. The board names are defined here, one per line, with a comment indicating what 3D Printers use it. Some of the most common options are provided below.
| Board | Note |
|---|---|
| melzi | Standard 8 bit Creality board |
| STM32F103RET6_creality | Creality 4.2.2 and 4.2.7 32 bit silent board used on the Ender 3 V2 |
| STM32F103RC_btt_maple | BIGTREETECH SKR Mini E3 V2 board |
| STM32G0B1RE_btt | BIGTREETECH SKR Mini E3 V3 board |
| TH3D_EZBoard_V2 | TH3D 32 bit board for Creality and Sovol 3D Printers |
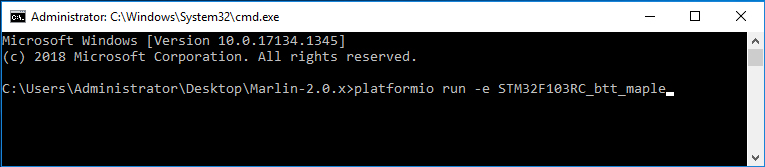
Once we know the board type, we’re set. Move back to the root directory of our ‘Marlin-2.0.x’ folder and open a new command prompt using ‘cmd’. Execute the following command, replacing board_name with the one found in the previous step.
platformio run -e board_name
In my case, I am using a BIGTREETEECH board, where mine is identified as ‘STM32F103RC_btt_maple’.
If everything works as expected, this process will take about 5 minutes to complete. When finished, we should have a confirmation message informing us that the build was a success.

Above the success message, we can see the compiled firmware has been placed inside of the directory ‘Marlin-2.0.x\.pio\build\board_name’. Depending on the board type, this will either be called “firmware.hex” or “firmware.bin”.
Flashing Firmware
Flashing custom firmware on modern boards couldn’t be more simple. If you’ve purchased a board from the BIGTREETECH SKR series, or the latest Creality 4.2.7 for example, follow these 3 steps and you’re done.
- Copy the ‘firmware.bin’ file to an SD card.
- Insert the card into the 3D Printer and power it on.
- Wait 30 seconds until the blue screen loads into the standard interface.
When exactly did this become so easy you might ask?
After years of overlooking such an important feature, manufacturers like BTT and Creality have finally started including a bootloader on their 32 bit boards. This is a small program stored in memory which makes it possible to write new firmware.
Better yet, they adopted the Smoothieware bootloader design, capable of loading firmware files right from the SD card. No longer is it necessary to connect the 3D Printer to a PC over USB cable.
Flashing a Bootloader on 8-Bit Boards
Unfortunately most budget printers, the Creality Ender 3 for example, do not come with a bootloader installed. These use a cheap 8-bit Melzi board with the bare minimum functionality. Short of spending $40 for an upgrade, the only way to write custom firmware is to first flash a bootloader.
The good news is, there are several ways to do it, none of which are too difficult. You will however need some specialized tools for the job, and unless these happen to be lying around, that money could be put towards a new 32 bit silent board.
In the guide, we make an ISP (in-system programmer) from an Arduino Uno and some breadboard wires. Both are fairly inexpensive items and common for hobbyists, where this may be an attractive option to some.
Alternatively, we can just purchase an AVR Programmer for less than $10 that is ready to use.
USB AVR Programmer - $9.99Regardless of what method you choose, they should more or less work exactly the same. It’s also worth mentioning, this is a one time task. Once a bootloader has been flashed to the board, it’s permanent, allowing you to write new firmware as many times as needed.
Hi there,
I’m glad you explained how to compile without VS Code.
But sadly it won’t work for me. When I want to compile and type run (…) into my cmd, I get the message “Error: Please setup environments in `platformio.ini` file”. It seems, the -e command won’t work anymore. But I can’t figure out how to setup the environments in the .ini file. Do you have an idea?
Hi Kat,
Make sure that your command prompt is in the right directory, the root folder of the Marlin firmware. Marlin includes a ‘platformio.ini’ file that’s already preconfigured with build environments. If you enter the command “dir” in the prompt, it should list all of the files and folders in the current working directory. Make sure you see ‘platformio.ini’ there.
Let me know if you’re still having trouble with this, I will be happy to help figure it out.
-Brett
Thanks for this guide, it’s clear and well written! I got to the compilation step and attempted to compile for the BOARD_MELZI_CREALITY board (since I didn’t see a better option for my V4.2.2 board in boards.h) but I’m getting an error “Error: Unknown environment names ‘BOARD_MELZI_CREALITY’. Valid names are” and then a whole list of board names. I’m confused though since the list of names it’s producing doesn’t seem to match the list of names given in boards.h. Am I missing something?
Hi J,
Thank you for the feedback. It looks like Marlin has changed the environment names since this guide was written. I’ve updated the list and “STM32F103RET6_creality” is what you will want to use for the Creality 4.2.2 board.
-Brett
Thank you for the tutorial! I am running into an issue when compiling with “STM32F103RET6_creality”, it is giving me the same error in Visual Studio Code as it is here (why I tried your method), any thoughts on why it failed below?
MemoryError: :
File “C:\Users\mejia\.platformio\penv\lib\site-packages\platformio\builder\main.py”, line 182:
env.SConscript(item, exports=”env”)
File “C:\Users\mejia\.platformio\packages\tool-scons\scons-local-4.3.0\SCons\Script\SConscript.py”, line 597:
return _SConscript(self.fs, *files, **subst_kw)
File “C:\Users\mejia\.platformio\packages\tool-scons\scons-local-4.3.0\SCons\Script\SConscript.py”, line 285:
exec(compile(scriptdata, scriptname, ‘exec’), call_stack[-1].globals)
File “C:\Users\mejia\Downloads\427-Silent\Marlin-2.0.x\buildroot\share\PlatformIO\scripts\common-dependencies.py”, line 247:
apply_features_config()
File “C:\Users\mejia\Downloads\427-Silent\Marlin-2.0.x\buildroot\share\PlatformIO\scripts\common-dependencies.py”, line 178:
src_filter = ‘ ‘.join(env.GetProjectOption(‘src_filter’))
Thank you for this guide. I just received my order for the heated bed and Y carriage for 3 point level. I read through through both of those guides and noticed the call out for adjusting the bed sensor temp. I then found this guide for compiling firmware which I have never done before. I just followed it after reading through a couple of times as well as reading through comments. My build was successful, but I have yet to test it as I still need to do my hardware install.
My reason for writing is to note that the board section is out of date for Creality. I did some searching before attempting my build due to some of the previous comments. Here is the successful command I ran. platformio run -e STM32F103RE_creality