After purchasing my fourth consumer 3D printer, I started playing with the idea of building the next one from scratch. After all, what’s more impressive than a custom built 3D Printer, made from a variety of printed parts? While there was no shortage of designs available, the D-Bot CoreXY 3D Printer is definitely the most popular choice. It is well constructed and easily the best option for a novice, where it has excellent documentation that covers the process from start to finish.
D-Bot Official Bill of Materials
D-Bot Official Build Guide
D-Bot Official Electrical Diagram
Excited to move forward, I reached out to our friends at Gulfcoast Robotics who offered to sponsor the entire build. With a massive inventory of high quality parts in stock, they supplied almost all of the components needed to move forward. Since any custom built 3D Printer will require its fair share of parts, this is often the biggest deterrent for many potential makers. To help ease this stress and facilitate more builds, they have subsequently agreed to make exclusive D-Bot Kits available, including the Frame, Electrical, Mechanical and Hardware. These will be available within the near future and will be linked here once they are ready for purchase. In the meantime, the individual parts list can be found below.
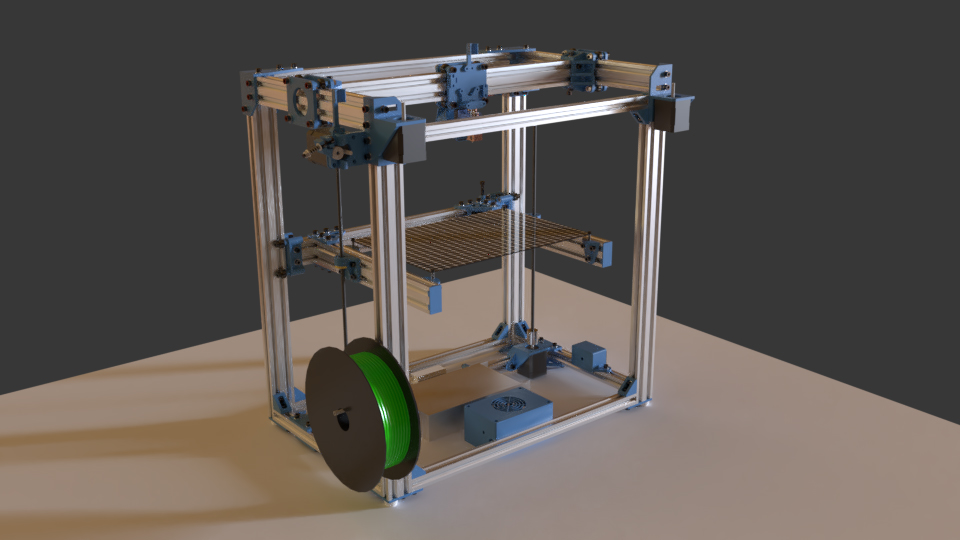
What is the D-Bot?
The D-Bot is a robust CoreXY style 3D Printer that can be easily customized. The standard build features a respectable print volume of 300x200x325mm, though this can be expanded even further with only minor adjustments. Better yet, an entire library of remixed designs has been developed by the community and are available at no cost through Thingiverse.
All manufactured components are readily available through online retailers, and the rest can be created on nearly any existing 3D Printer. For purchased parts, Ebay and Aliexpress will offer a considerable savings at the cost of extended shipping times. While planning ahead can save on the total build costs, Amazon remains the most quick and accessible choice and relevant purchase links are included in the custom Bill of Materials below. RepRap Champions make many of their products available there for purchase and stock almost everything needed for the build.
Getting Started
Through out the course of this guide, we will build a large frame D-Bot with a print volume of 300x300x425mm (12x12x17″). The instructions will be provided in stages, where we will start with the Frame construction, followed by the installation of Electrical and Mechanical components, and conclude with the Software setup and configuration. In doing so, builders with a limited budget or time constraints can purchase and print parts as needed, avoiding the large upfront investment otherwise associated with such a project.
While the official D-Bot Build Guide and Bill of Materials are an excellent source of information, they do assume a certain level of prior knowledge and experience. Through quite a bit of trial and error, I was able to overcome many of the obstacles the average builder may encounter. As such, this is not intended to replace but rather compliment the existing documentation, with emphasis on areas in which I struggled or important details I found to be lacking.
To get started, the Frame and Hardware items (listed below) will be needed. The table of printed parts also has the relevant stages denoted, where those for the Frame should have first priority in order of what to print. It is strongly recommended to print these with PETG filament (Guide: How to Print with PETG), where the increased strength and flexibility will prevent cracking under stress.
Purchased Parts List
| Frame Parts | ||||
|---|---|---|---|---|
| Item | Quantity | Unit Cost | Total Cost | Order |
| V-Slot Extrusion: 20x20x1500mm | 2 | $15.00 | $30.00 | Open Builds |
| V-Slot Extrusion: 20x40x1500mm | 4 | $19.50 | $78.00 | Open Builds |
| Electrical Parts | ||||
|---|---|---|---|---|
| Item | Quantity | Unit Cost | Total Cost | Order |
| 1 | $0.00 | $0.00 | Amazon | |
| Nema 17 76oz Stepper Motors | 5 | $5.99 | $30.00 | Amazon |
| RAMPS 1.4 Kit | 1 | $39.99 | $39.99 | Amazon |
| 300x300 PCB Heated Bed | 1 | $0.00 | $0.00 | Amazon |
| Mechanical Endstops | 3 | $9.90 | $9.90 | Amazon |
| 12V/30A Power Supply | 1 | $19.99 | $19.99 | Amazon |
| 40mm Cooling Fans | 2 | $14.58 | $29.00 | Amazon |
| 100k 3950 Thermistor | 1 | $9.99 | $9.99 | Amazon |
| Solid State DC Relay | 1 | $0.00 | $0.00 | Amazon |
| 2.54mm Connector Kit | 1 | $13.99 | $13.99 | Amazon |
| Power Socket and Switch | 1 | $5.69 | $5.69 | Amazon |
| Mechanical Parts | ||||
|---|---|---|---|---|
| Item | Quantity | Unit Cost | Total Cost | Order |
| Mini V Wheels | 20 | $0.90 | $18.00 | Open Builds |
| Mini V Wheel Precision Shims | 20 | $0.20 | $4.00 | Open Builds |
| MR105ZZ Bearings | 40 | $13.49 | $27.00 | Amazon |
| F623ZZ Bearings | 16 | $0.00 | $0.00 | Amazon |
| 625ZZ Bearing | 1 | $9.03 | $9.03 | Amazon |
| 500m Lead Screws | 2 | $0.00 | $0.00 | Amazon |
| 5mm x 8mm Flex Couplings | 2 | $9.99 | $20.00 | Amazon |
| GT2 16t Pulleys | 1 | $8.69 | $8.69 | Amazon |
| GT2 Timing Belt | 1 | $7.99 | $7.99 | Amazon |
| GT2 16t Pulleys | 1 | $8.69 | $8.69 | Amazon |
| Miscellaneous Parts | ||||
|---|---|---|---|---|
| Item | Quantity | Unit Cost | Total Cost | Order |
| Spring Kit | 1 | $4.37 | $4.37 | Home Depot |
| Binder Clips | 1 | $8.99 | $8.99 | Amazon |
| Thermal Adhesive | 1 | $4.99 | $4.99 | Amazon |
| Rubber Feet | 4 | $8.99 | $8.99 | Amazon |
| Corkboard Insulation | 1 | $15.30 | $15.30 | Amazon |
| Split Wire Loom | 1 | $10.39 | $10.39 | Amazon |
| Hardware Parts | ||||
|---|---|---|---|---|
| Item | Quantity | Unit Cost | Total Cost | Order |
| M3 Socket Bolts 8mm | 33 | $0.07 | $2.31 | MrMetric |
| M3 Socket Bolts 10mm | 9 | $0.07 | $0.63 | MrMetric |
| M3 Socket Bolts 20mm | 13 | $0.11 | $1.43 | MrMetric |
| M3 Socket Bolts 25mm | 15 | $0.18 | $2.70 | MrMetric |
| M3 Nuts | 32 | $0.02 | $0.64 | MrMetric |
| M3 Nyloc Nuts | 17 | $0.02 | $0.34 | MrMetric |
| M3 Washers | 82 | $0.03 | $2.46 | MrMetric |
| M4 Socket Bolts 40mm | 4 | $0.14 | $0.56 | MrMetric |
| M4 Washers | 4 | $0.01 | $0.04 | MrMetric |
| M5 Socket Bolts 10mm | 196 | $0.08 | $15.68 | MrMetric |
| M5 Socket Bolts 12mm | 1 | $0.17 | $0.17 | MrMetric |
| M5 Socket Bolts 20mm | 1 | $0.14 | $0.14 | MrMetric |
| M5 Socket Bolts 40mm | 22 | $0.20 | $4.40 | MrMetric |
| M5 Socket Bolts 75mm | 1 | $0.46 | $0.46 | MrMetric |
| M5 Nuts | 9 | $0.03 | $0.27 | MrMetric |
| M5 Nylock Nuts | 14 | $0.07 | $0.98 | MrMetric |
| M5 Square Nuts | 185 | $0.04 | $7.40 | MrMetric |
| M5 Washers | 205 | $0.01 | $2.05 | MrMetric |
| M5 Washers 15mm OD | 22 | $0.03 | $0.06 | MrMetric |
Printed Parts List
| Printed Parts | |||
|---|---|---|---|
| Item | Quantity | Stage | Order |
| Corner Brackets | 14 | Frame | Download |
| 3x3 Plates | 10 | Frame | Download |
| 2x1 Plates | 2 | Frame | Download |
| Rear Idler Right | 1 | Frame | Download |
| Rear Idler Left | 1 | Frame | Download |
| Motor Mount Right | 1 | Frame | Download |
| Motor Mount Left | 1 | Frame | Download |
| Motor Mount Z | 2 | Frame | Download |
| Endstop X Bracket | 1 | Electronics | Download |
| Endstop Y Bracket | 1 | Electronics | Download |
| Endstop Z Bracket | 1 | Electronics | Download |
| Extruder | 1 | Electronics | Download |
| Z Wheel Guides | 4 | Mechanical | Download |
| Lead Screw Brackets | 2 | Mechanical | Download |
| Bed Support Brackets | 4 | Frame | Download |
| H-Bar End Right | 1 | Frame | Download |
| H-Bar End Left | 1 | Frame | Download |
| H-Bar End Plates | 2 | Frame | Download |
| Print Carriage Front | 1 | Frame | Download |
| Print Carriage Rear | 1 | Frame | Download |
| E3D V6 Hotend Clamp | 1 | Electronics | Download |
| Cooling Fan Duct | 1 | Electronics | Download |
| Belt Clamps | 4 | Mechanical | Download |
| Wheel Spacers | 32 | Mechanical | Download |
| Bearing Shims | 20 | Mechanical | Download |
| Tubing Holders | 2 | Optional | Download |
| Power Supply Clamps | 2 | Optional | Download |
| Power Switch Mount | 1 | Optional | Download |
| RAMPS 1.4 Case | 1 | Optional | Download |
Where is Part 2 through n?
Hi Keith,
You can find How to Build a D-Bot 3D Printer (Part 2: Frame) here, although the Part 3 and 4 were heavily delayed. While my D-Bot prints fine and works well enough, I was not happy with several of the original design choices that I feel could be improved. Mostly pertaining to things like the X Carriage, V-wheels, etc. I’m currently in the process of switching the V-wheels to cheap linear rails (on both the X and Y axis) and adding smooth rods to the Z axis, and then I will post the other two guides.
I realize this is nearly a year later, but if you never finished your D-Bot mods to your satisfaction let me suggest that simply converting from the standard 2-stepper, 2-leadscrew D-Bot Z axis to a 3-leadscrew, 1-stepper belted system is amazingly awesome, resulting in a Z axis that cannot get out of alignment, moves well, etc. Using a 3:1 or 4:1 reduction system (larger pulleys on the leadscrews than is on the single stepper) not only ensures that one stepper can easily drive all three leadscrews, but also improves the resolution of the Z axis (each step of the stepper represents a smaller +/- Z-axis movement, so Z moves are more fine grained).
When I converted my D-bot from standard Z axis to 3-leadscrew belted with only one stepper, it was actually really easy. I mixed a couple parts someone else had come up with with some parts I designed to better support the leadscrews, and it all fit into more or less the same space in the D-Bot, and the whole upgrade was actually quite simple and extremely effective.
Also, I used a Duet Wifi controller for the D-Bot, instead of the cheap generic controller originally specified. The Duet Wifi controller is pretty amazing, and makes this printer so easy and such a joy to control. Hands down the best way to go, albeit a little more expensive than the cheap controller originally specified.
Is it possible to build D-Bot without printed parts? I don’t have a 3d printer that I could use for printing the parts..
If not, can you please recommend which corexy printer can be built without printed parts?
Hey John,
Sorry for the delayed response, was out camping for a few days without any technology. To answer your question, you can build a CoreXY without printed parts but the D-Bot specifically is made to be 3D printed. Some items can be swapped out, such as the triangle brackets on the corners are just a printable equivalent of the aluminum ones sold online.
As for other designs, most of the ones I am aware of use 3D Printed parts, such as the HyperCube, Voron, etc. You can buy the 3D Printed parts as a kit on Ebay (other people make them for you) but I don’t know of plans for a CoreXY that is all metal. With that said, you could probably put something together without too much pre-existing knowledge, although I would do some research in to design choices, such as using v-wheels vs. linear rails, the thickness of aluminum extrusion, etc.
If you have any other questions or need help figuring out how you want to move forward, just use the Contact form and we can chat about it in more depth!