In contrast to most budget 3D Printers, the Ender 3 series doesn’t require an aftermarket Y Carriage Plate to fix problems. Considering this machine is among the cheapest on the market, Creality3D did an excellent job on the build quality and the stock carriage is perfectly sufficient. There is always room for improvement though and the traditional 4-point leveling is not just inferior, it can be problematic as well.
That is where the new Aluminum Y Carriage Plate Kit becomes a direct upgrade. Featuring a unique bar design, it creates an additional mounting point that supports both 3-point and 4-point bed leveling configurations. If we go back to geometry class for a second, remember that 3 points are all we need to create a plane, that 4th point just creates trouble.
So why is this still being used on almost every 3D Printer? No clue. Compared to the hassle of tweaking 4 corners while thrusting a sheet of paper, 3-point leveling is a almost a miracle. You only have to level one side with the nozzle, then adjust the 3rd point on the parallel side to bring it into alignment. It makes complete sense but thus far, manufacturers just started supporting it.
Purchased Parts
Modular 3-Point Y Carriage Plate - $31.99Instructions
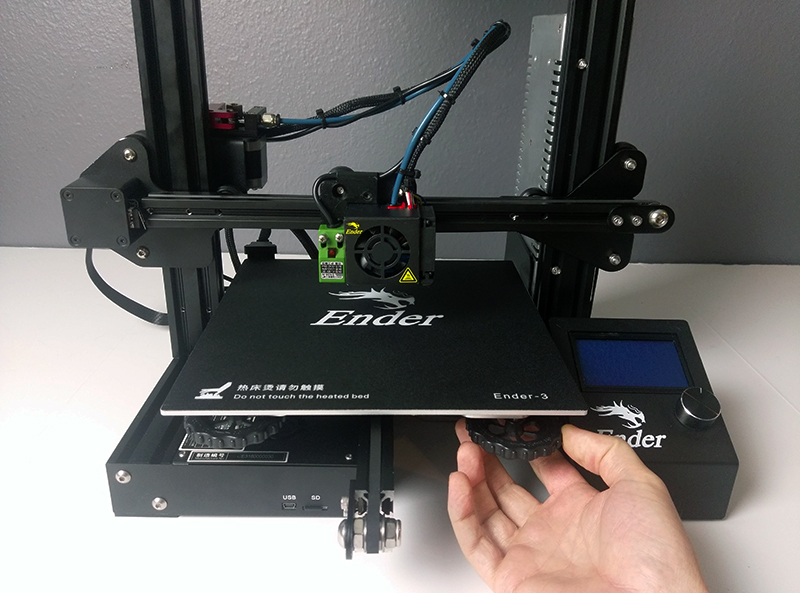
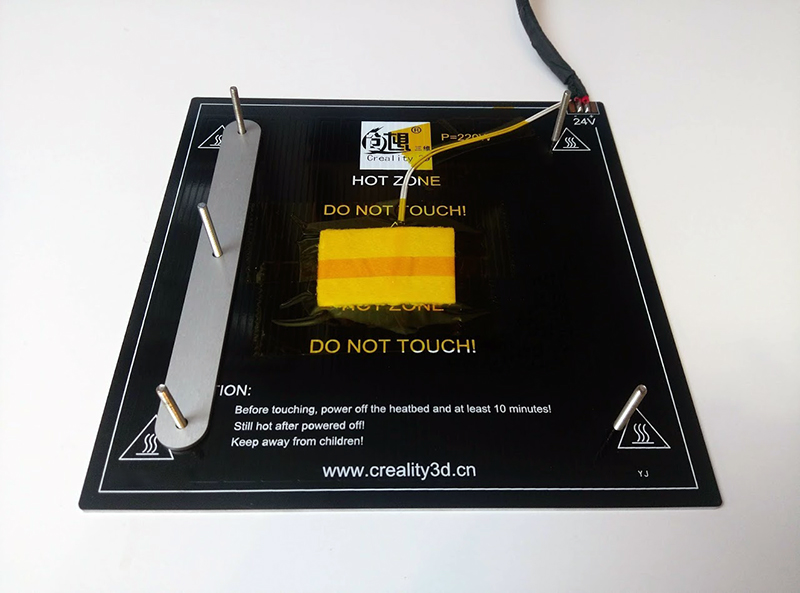
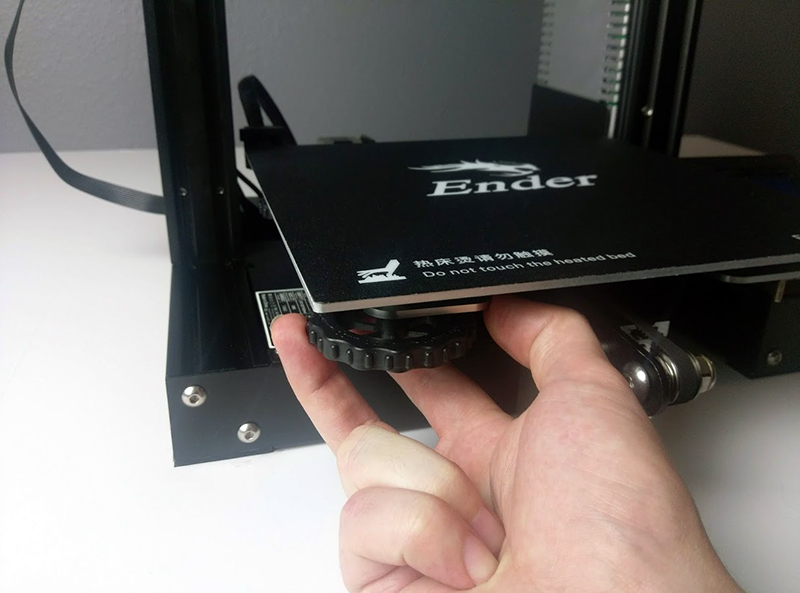
To access the Y-Carriage Plate, we need to first remove the heated bed. Since this is held in place by thumb wheels in each corner, we can just loosen each of them (turning clockwise) until they spin free and fall off. The upwards pressure pulls them against the carriage, so you may need to press down gently on the corner of the bed to give it some slack.
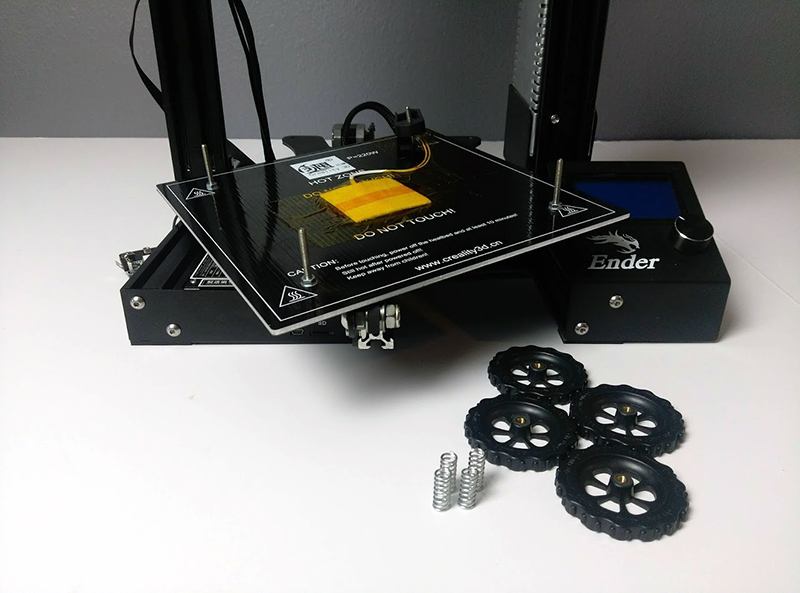
Carefully lift the build plate until the screws in each corner slide out of the carriage. Once separated, turn it upside down and place it behind the machine to clear some space, making sure not to stress the wires when doing so. Collect the springs & thumb wheels and set them aside for reassembly.
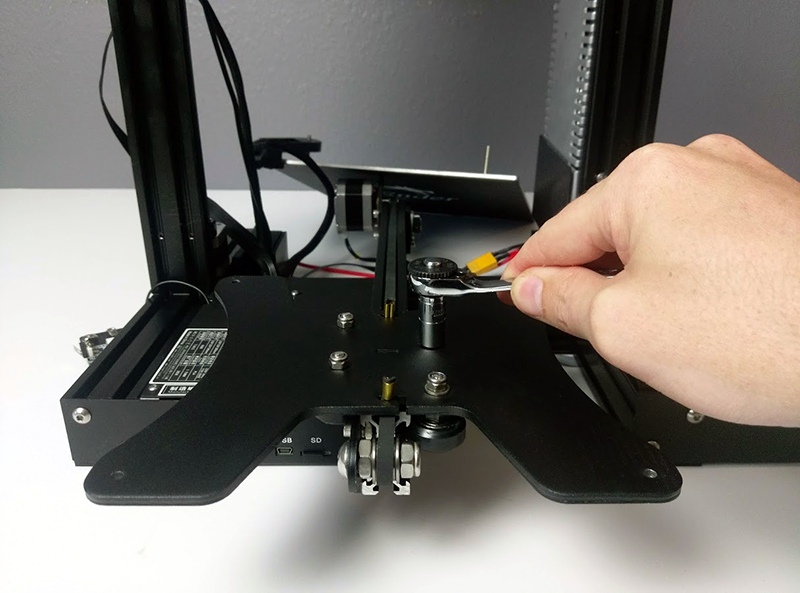
Using an 8mm socket wrench, loosen the nuts on top of the Y-Carriage Plate. We only need to remove (2) v-wheels on one side for now, the rest can be done once it is taken off the machine.
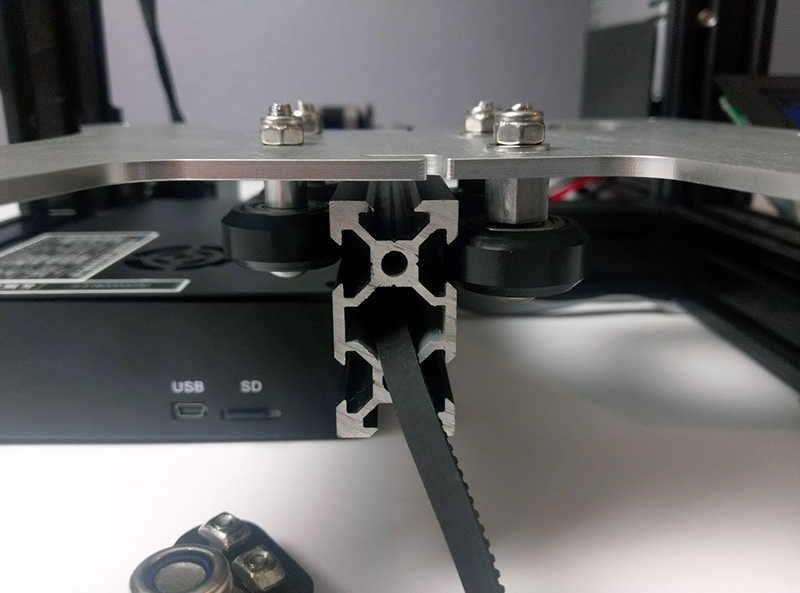
The carriage is still held in place by tension from the belt, so we also need to loosen the belt tensioner to create slack. Using a hex wrench, unscrew the 3 bolts on the side of the tensioner bracket until it can slide inwards, then slip the gold belt ends out of the Y-Carriage Plate grooves. Take the carriage plate of the Y axis and finish removing the other (2) v-wheels.

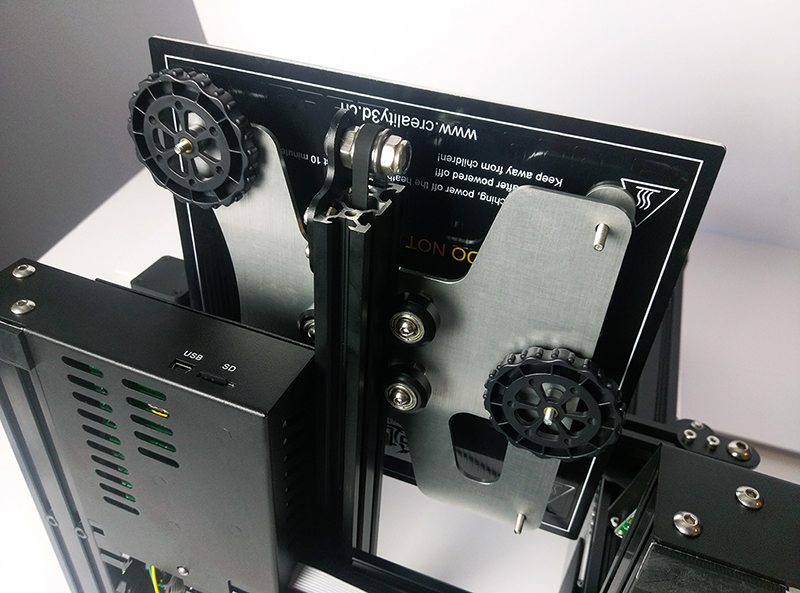
Go ahead and grab the new aluminum Y-Carriage Plate and start assembling it with the original v-wheels. It’s important to pay attention to the design of this plate as it isn’t symmetrical, the left side is curved and the right side is straight. There is also a hole in one corner, which will be located in the back right of the Ender-3 after we have reassembled the machine.
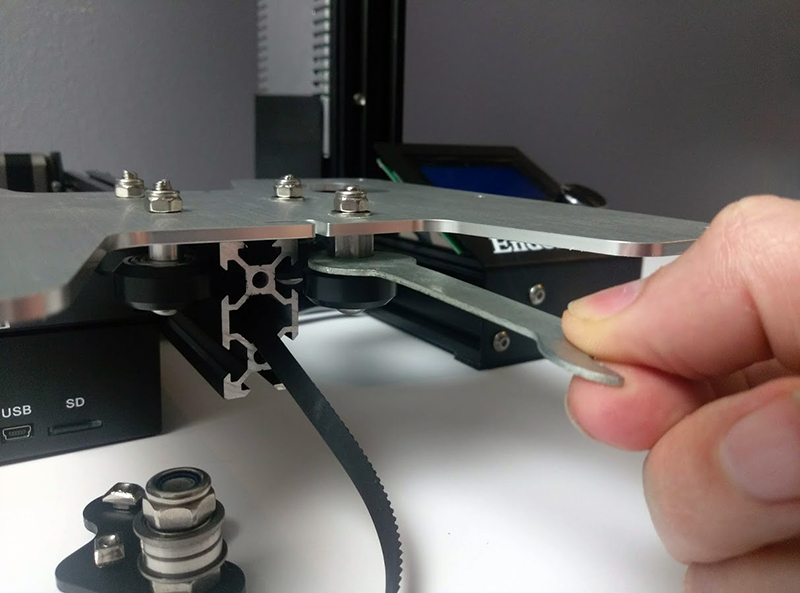
Since the belt tensioner is already loose from the previous steps, I opted to just go ahead and remove it for now. Doing so will allow you to roll the v-wheels in to the extrusion channels and push the carriage on from the front, which is quite a bit easier than trying to reassemble it on the frame. If the v-wheels are too tight, use the spanner wrench and loosen the eccentric nuts.
When installing the v-wheels on the new Y-Carriage Plate, the eccentric nuts go on the right of the plate. If you are unfamiliar with eccentric nuts, look at the second picture below and compare the right side to the left. These can be turned either direction to tighten/loosen the wheels as needed, where they will clamp in to the channel on the metal extrusion.

With the new Y-Carriage Plate installed, go ahead and adjust the eccentric nuts until they are tight. Make sure there is absolutely no wiggle in the carriage when you push down on the corners, it should be locked firmly in place but still able to roll forwards and backwards with a smooth motion.
Once finished, the last step is to reinstall the rubber belt. If you removed the belt tensioner on the front as I did, slide this back in to place and wrap the belt around the pulleys on the front and back of the machine. Insert the golden ends in to the L shaped grooves on the carriage to secure them in place, and then tension and tighten the belt.
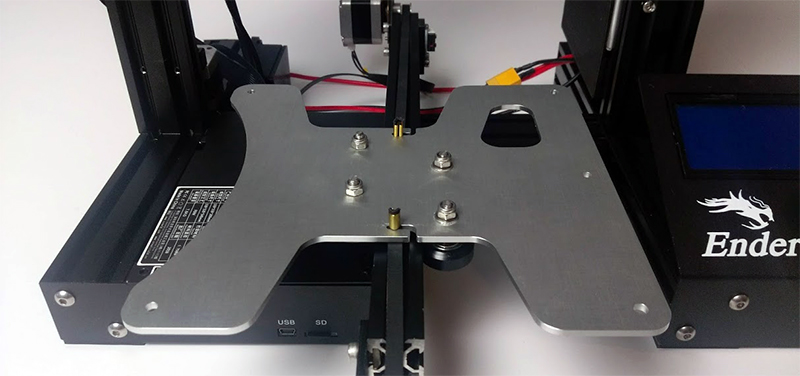
At this point we are finished with the Y-Carriage Plate installation, but use the picture and checklist below to make sure that everything is correct.
✅ Flat edge is located on the right side
✅ Eccentric nuts are located on the right side
✅ Washers are located on the right side
✅ Carriage plate hole located in the back right corner
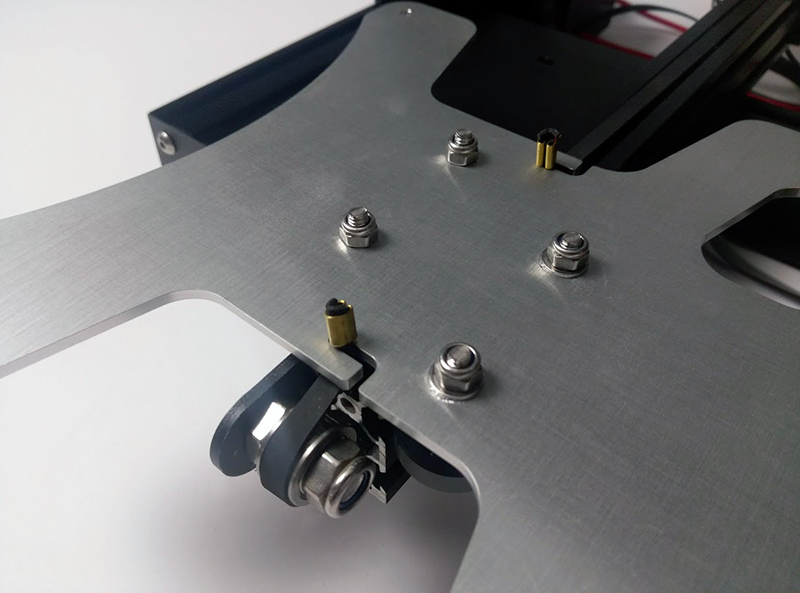
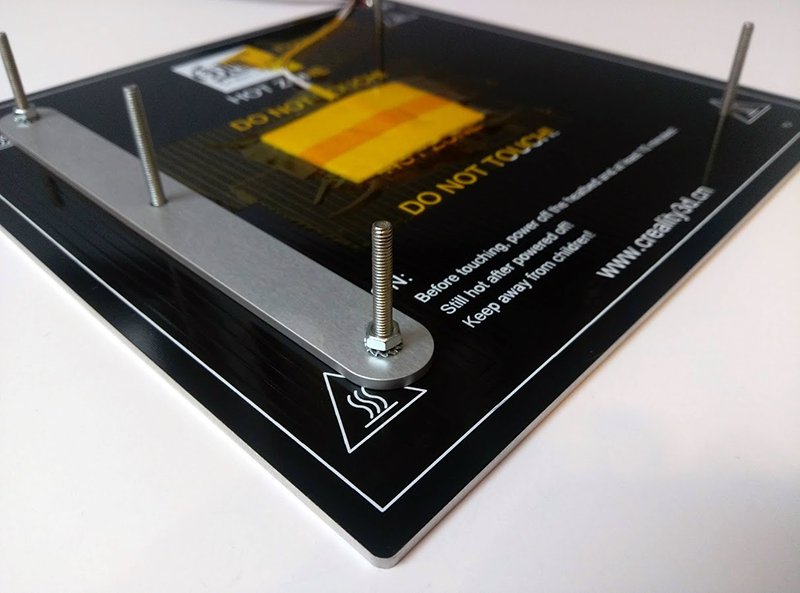
The magic of this Y-Carriage Plate is the support for 3-point bed leveling, and the unique bar design is what makes that possible. To install it, insert the included screw through the mounting bar’s center hole. Holding this in place, position it on the right side of the heated bed (left side when it is upside down) as shown below.
The kit includes (2) M4 nuts and (2) M4 lock washers, where these are placed at the ends on the original bed screws to secure it.
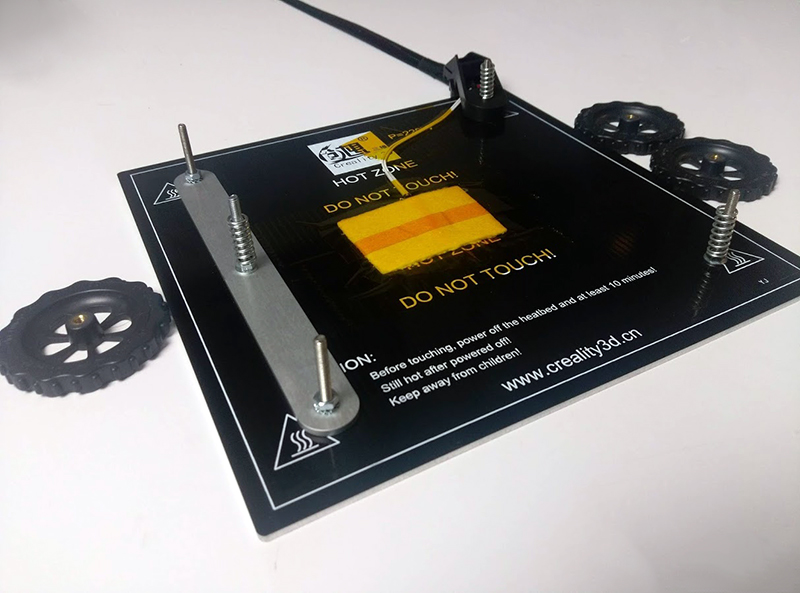
At this point, you have the choice between the improved 3-point leveling or the original 4-point approach. As 3-point leveling is the purpose of this upgrade it is definitely recommended, but you can always switch back and fourth as it does support both. Put the original bed springs on the screws where appropriate, then turn it over (while holding them in place) and set it on the new Y-Carriage Plate.
It may take some maneuvering to get all 5 screws in to the carriage, but once they have passed through the holes, go ahead and screw the thumb wheels back on to wrap things up.
What’s the increase in mass? Any observed increase in ghosting/ringing due to the increased mass?
I’ve asked for the weight of this product (don’t have a scale on hand) and will update once I have it, but just holding the original plate and this one, it actually felt considerably lighter than the stock carriage. This was without the 3-point mounting bar so that would add to the total, but I would venture to guess this one is nearly the same if not a bit less. To answer your other question, I have only done several prints since installing it, but have not noticed any different in print quality at all.
I spoke to the designer tonight and the weight results are as follows. So if you are going for only weight reduction, just using the Gulfcoast Robotics plate is about a 23% weight savings. With the 3-point leveling bar included, it is considerably less (although still a bit lighter than stock).
– OEM Y-Carriage = 250g
– Gulfcoast Robotics Y-Carriage = 195g
– Gulfcoast Robotics Y-Carriage Bar = 25g
I had issues with the stock bracket bumping against the motor after installing a y-axis damper. This prevented the bed from contacting the limit switch by approx. 1cm. Does this bracket allow for that?
Hi Chad,
This has come up several times recently on my Damper guide and the Youtube video I posted of the before/after. I bought one of the early models after the Ender-3 was first released, where the machine doesn’t have any clearance issues like others have described. With that said, there are a number of brackets on Thingiverse (like this one) that will address that problem.
As for this Y-Carriage Plate, the design is very close to the stock plate, so it likely wouldn’t make any difference in regards to clearance. I would imagine that you will still need a printed bracket for the Y-axis motor to clear the damper.
Flip over the carriage. The holes for the modular addons needs to go towards the front.
I ran into the same problem. Flipped it over, no problem.
Hello do you think you could do a short guide on how to level with this system on the ender 3 specifically?
Hi Zack,
While I generally prefer written guides, I actually think that would be better done as a video. I don’t have much equipment but I will work on putting together a demonstration clip to show the process, should have it available on Thursday. In the meantime, it is actually quite simple and I can give you the basic idea.
– For the first time leveling the bed (with 3 or 4 points), I tighten down all of the bed screws to bring them roughly to the same height
– Go around the build plate and loosen them about 4 turns each to raise it towards the nozzle, keep doing this until it is within a few millimeters
– For 3-point leveling, start on the side with 2 bed screws and level these with each other, sliding the bed back/forward until they are both leveled
– Move over to the opposite side with 1 bed screw, position the nozzle over it and raise the bed (loosening the spring) until it is level
At this point, it should be pretty much near perfect. Position the nozzle over each bed screw and double check, testing the distance with a sheet of paper once more, fine tuning them if needed. After it has been leveled the first time, all you really need to do in the future when re-leveling is start with the side that has 2 bed springs, level them with each other, then raise/lower the 3rd point on the opposite side afterwards.
Brett I 100% need a 3 point bed leveling video.
Hey Ryan,
Just a video showing how to level using 3-points, or showing the installation process of the Y-Carriage? I actually already recorded an install video (since some people still seemed to be having issues with this written guide) but all of the footage came out being rather poor quality. I’m building a large light box with tons of LEDs for video/photography this weekend and will re-record both as soon as I have that wrapped up.
-Brett
The Y axis on the Ender Pro is 40 mm wide in lieu of 20 mm. It apears this plate may not be compatible with the Pro unless there are multiple wheel holes. Please confirm.
Hi Thomas,
This particular model is designed for the Ender-3’s 20mm Y axis and won’t fit the Pro model. There is a new version in the works that should have support for the Pro model as well, although I don’t really have any idea when it will be available.
Great article, thanks for providing it. It’s what made me decide to do this mod.
I have a couple comments/questions.
I don’t remember geography class that well, but I think it took a wide open space to make a plain, not three points. ;)
I’m confused about something that I can’t see very well in the pictures. Do you put lock nuts on all five screws?
You end up with five long screws coming down below the bed. Three are mounting points for the wheels. What are the other two hanging down so far for, if anything? If it isn’t necessary for them to be quite so long, can shorter screws be used instead? Do you put lock nuts on those two under the surface where the wheels would have gone?
I forgot how the spring went back together on the plate at the heating connector. Does it go above or below the plastic thing? Like, inside the cupped bit?
I understand the basics of the purpose of this mod well enough to recognize it’s potential, but I am having a tough time picturing how it actually accomplishes the leveling. A diagram illustrating the movement effect of each wheel would really help.
In the pictures with the leveling wheels attached, it looks like there might be some kind of spacer between the wheels and the plate. Am I seeing things, do we have different hardware, or did I lose something?
About those two long screws hanging down I asked about earlier; would it make a difference to put springs on them between the carriage and the bed?
Since the leveling process should be much easier now, should lock nuts be used under the leveling wheels to keep them from accidentally turning? (I used nylon lock nuts on mine just because I had some around.)
It would really help if you could add a picture taken from the front of the Ender, looking straight through the gap between the carriage and the plate, at a slight angle to the left or rightly so all five screws, springs, and wheels are visible.
Sorry, that turned out to be more than just a couple questions. :)
Thanks!
Hi Mike,
Thanks for pointing that out, your comment made me laugh once I realized what you were referring to. I proofread everything I write numerous times, yet somehow overlooked “geography” when I meant “geometry”. To address each one of your questions…
I’ll see if I can grab you a photo soon, I have the Ender-3 apart right now for several different guides I am working on, but will take a picture as soon as I get it put back together!
Thanks very much for the info!
Just finishing up the assembly now. We’ll see if I have any clear what I’m doing….
Got mine up and running and definitely glad I received version 2! Plenty of room for the y stepper motor with a damper attached. Thanks for the engineering and time that went into this. It seems to be performing as well as the 4-point stock carriage, but need more experience to really asses.
My after thoughts for those discerning a purchase are:
1. What sold me on this carriage was actually the geometry principle. If money is tight, for just a few bucks more might be worth just getting an ABL system. Heck, I probably still will in the near future, so I guess this 3-point carriage is just a “nice-to-have”.
2. Bed does seem to stay level longer, but there are cheaper ways to achieve that if you are really in a pinch.
Hi,
I followed your guide but I think I did something wrong. The side with the one spring is sitting much higher compared to the other one when I have all the screws on and tightened down. Did you run into this? Not sure what’s causing this and I have re done assembly three times already. I’m using yellow springs not sure if thats why but I doubt it.
I have the same issue with the single spring side being higher than the other two. Did you ever resolve it?
Do you have any suggestion as to why the rear right side of my plate would be significantly higher than the rest of the plate? It seems as though the bar part is not pulling evenly across the right side of the plate where it is installed.
Hi Doc,
It sounds like your Ender-3 bed is most likely warped. One of the reason Chinese manufacturers use 4-point bed leveling is to mask quality control problems. Even if your bed is deformed, 4-points can often pull it in to a somewhat flat shape and make it kind of usable, even if it’s not perfectly flat (which it should be). If you take the bed off and lay it face down on a flat surface (kitchen counter is usually a good option), you should be able to tell if it’s raised in certain areas.
If this is the case, you have a couple options. You can contact the vendor you purchased the 3D Printer from, I had the same issue with my Ender-3 from Comgrow on Amazon, they sent out a replacement heated bed that was much more flat (not perfect but good enough). If the warp isn’t too bad, you can also try and bend the bed back a bit. This is much easier done if the entire plate is curved like a taco, might be more difficult if it’s just the rear corner. You can always install the new Y carriage with 4 point leveling temporarily and add the 3-point leveling bar at a later time.
Overall, 3-point leveling is a significant upgrade, but does make it very obvious if your bed’s surface isn’t flat. Let me know if you need any more help!
This!
I’ve been stuck with this exact problem the last few days. I couldn’t level the 3-point to save my life. When level, the back right sits higher than the front right.
I hadn’t even considered this since I upgraded to a glass bed.
I feel pretty silly after reading this and having that lightbulb moment.. Since if what the glass is sitting on is bent, it will still be bent and be instantly noticeable after changing from a compensating 4-point to a 3- point leveling system.
At least ik it’s not with the kit!
On to fixing the next problem..
It is higher because of the bar accross the heated build plate. If all 3 springs are fully compressed the right side is bound to be higher. Just adjust the right spring to be tight and then adjust the 2 left springs to bring the bed something like level, then back them all off a couple of turns. Now you are set do do the levellingin the usual way.
Hey man, thanks for the guide. I’m not sure if you were aware or not but golf Coast robotics is linking your guide on their website as a user manual.
Your instructions are kind of ambiguous about the center screw on the 3-point bar. In your pictures you have a nut on the center screw, but the kit only comes with two M4 nuts, and they are use for each of the corners on the right side. Is this center screw supposed to be secured to the bar somehow? Or does it just dangle loose?
Hey Jason,
No problem, hope it helped! I actually do the Customer Service at GCR, the owner asked if he could link my guide on the product page and I gave permission to do so. Thanks for the heads up though, a ton of websites lately have been straight up copying my images, content, etc. without permission or even giving credit, where I appreciate my readers letting me know about it.
A couple Chinese sellers on Amazon even copied the Gulfcoast Robotics Ender-3 carriage design, then stole the text from this article vebatim for the product description, but Amazon won’t respond to my requests to make them change the text. It’s kind of funny seeing my sentences written in first person being used for product bullet points though.
As for the information here, it’s a little bit outdated now. I wrote this guide with the first revision of the product, but the Ender-3 Y Carriage has been redesigned a bit and is basically V2. The v-wheel bolt pattern has been changed from staggered to square (to match new Ender-3 printers), there are additional bolt holes for the Ender-3 Pro, and Modular bolt holes have been added to mount printable designs. The installation steps are still the same for the most part, but as you mentioned, hardware is a bit different too. I will check to see what hardware is being sent exactly and look at getting this updated to make it a bit more clear!
hi, im looking to upgrade my ender 3’s bed and id like to use this product. problem is i’m based in the uk so i cannot buy the product you have linked and the other ones i find on amazon are the copied versions so i would prefer to buy the original do you know anywhere i could buy it for the uk? thanks.
I received my order from Amazon today and ran into a snag when putting it together. Where is the long screw for the 3 point leveling? The kit came with 2 short screws, 2 nuts and 2 external tooth lockwashers but no long screw for the 3rd leveling point. I don’t see it in your Amazon ad either. What am I missing?
Hello so I am having a problem with springs, I ordered yellow springs so I wouldn’t have to level as much and the bar makes it to where the side with the bar cant do down enough to be level. Do you know what size spring I need for the side with 1 point so I can use all yellow springs?
Thanks for your time.
https://www.amazon.com/gp/product/B07GXC1G2B/ref=ppx_yo_dt_b_search_asin_title?ie=UTF8&psc=1
These Are the ones I use.
This guide seems older and missing the nut for the longer bolt on the left side. I have the 2 nuts for the end bolts and they gave me 2 smaller bolts(what are those for?) but the middle bolt needs a nut as per your picture near the end.
This should have been a 15 min install and has turned into almost an hour for me.
Hi Carlton,
I am sorry about the confusion, the Y-Carriage plate kit has been changed a bit since I wrote this guide. I’m recording an updated video right now and will be wrapping up today or tomorrow at the latest.
Those (2) shorter bolts are optional, intended for 3-point leveling configurations. These are just for those that prefer to replace the existing bed leveling screws on the Front Right/Rear Right. Not everyone will want to use these, as the original screws are hidden under the BuildTak sheet or magnetic removable mat. If you can access and replace them however, it just looks a bit nicer having shorter screws. Since the V-Wheels aren’t in those 2 corners anymore, these screws are only used for mounting the bar to the heated bed.
The middle bolt doesn’t come with or need a nut on it, I should have clarified this in the text. This is just something I add on most of my 3D Printers, placing a nut before the spring. The idea used to be that this would minimize vibration and prevent the need to level as often, but it doesn’t really do much in my experience. Those yellow compression springs are far more useful for keeping the bed leveled for longer periods of time.
-Brett
I agree with Carlton, I want to know what the two shorter bolts are and is the longer bolt on left side supposed to be secured with a nut? I didn’t find one in the package of hardware. The install directions need to be updated.
Hi Ed,
Not sure if you get a notification when I respond to someone else, but I just posted the answers in response to Carlton’s message. Those 2x small bolts are optional, just a convenience for anyone that wants to replace the long corner screws in 3-point leveling setup. The middle screw doesn’t come with or need a nut, that is just something I added out of habit. I’m working on updated instructions right now, but hopefully that should clarify things for the moment.
-Brett
I ended up using a m4 nut for the middle bolt that I had laying around. Got it all together and it was easier to level. Time will tell though.
I should have did a video and documented my process. After all was done it was hard per-say, but they did add more holes than the one above.
The only question left is what are those smaller screws for!
There is a comment from 2018 above that the 3 point leveling model available at that time wouldn’t fit on the 40mm wide Y-rail but that an update was in the works. Has this update been released? Thanks!
Pretty straightforward install and a solid product – 3 wheel leveling is definitely an improvement over 4 wheel.
One minor issue I ran into (and this is not GCR’s fault) – for people with an original Ender 3 with the staggered v-wheels, using the square wheel pattern on this will lose you ~15mm of y travel until you replace the y-tensioner with one that doesn’t have a protruding portion on the top half of the 2040 profile.
Installed the new version today combined with a brand new heated build plate and I cannot get the back right corner to level correctly. The side with 2 wheels is perfect, and the front right corner matches, but my rear right corner is low by a about .2mm. Not sure if I installed something wrong, or if it is just bad luck. Using a magnetic flex spring steel bed so maybe that is part of it.
Hi Shaun,
Are you using the 3-point leveling bar included with the Y Carriage Plate, or does the heated bed you purchased have integrated 3-point leveling support already included?
-Brett
Hi Brett –
Is the installation video available? If so, could you please post the link?
Thanks!
Is the 3 point leveling bar necessary if I bought the heated bed from Gulfcoast as well? With all the additional space between the actual plate and the bottom of that bar, the right side sits almost 5 mm higher then the left side before placing any tension on the springs. I’ve seen several others ask about similar issues, but did not see a response. Any help would be much appreciated.
Hi John,
The bar is not needed if you bought the heated bed as well. It already comes with the necessary holes for 3-point leveling, whereas the bar is designed to retrofit the stock heated bed with 3-point support.
-Brett
Ahh thanks for this so basically if you have both the 3-point leveling AND the heated bed. You just skip the bar… and use only the one screw on the right side?
Just installed it on my Ender 3 pro. The carriage is hitting the motor block for the y Axis.
Any suggestions?
Hi James,
Make sure that you have the orientation correct. It may be installed backwards, where the shape is only intended to fit one way that provides proper clearance.
-Brett
I didn’t even think about just flipping it over… I should have tested it first to make sure it cleared. As it is I just moved the y stop up.
Thanks, it’s amazing how easy it is to level it now.
This does not reach the Y-Endstop on a base Ender-3 unit. I tried flipping the plate and then it started hitting the motor.
Hi Ian,
Make sure you have the orientation correct. While there’s 4 possible ways that this can be installed, only 1 is correct. The straight edge should be on the right side nearest the LCD screen and the modular mounting holes on the front. If the plate is backwards, upside down or both, it will collide with the Y axis stepper motor before triggering the endstop.
-Brett