
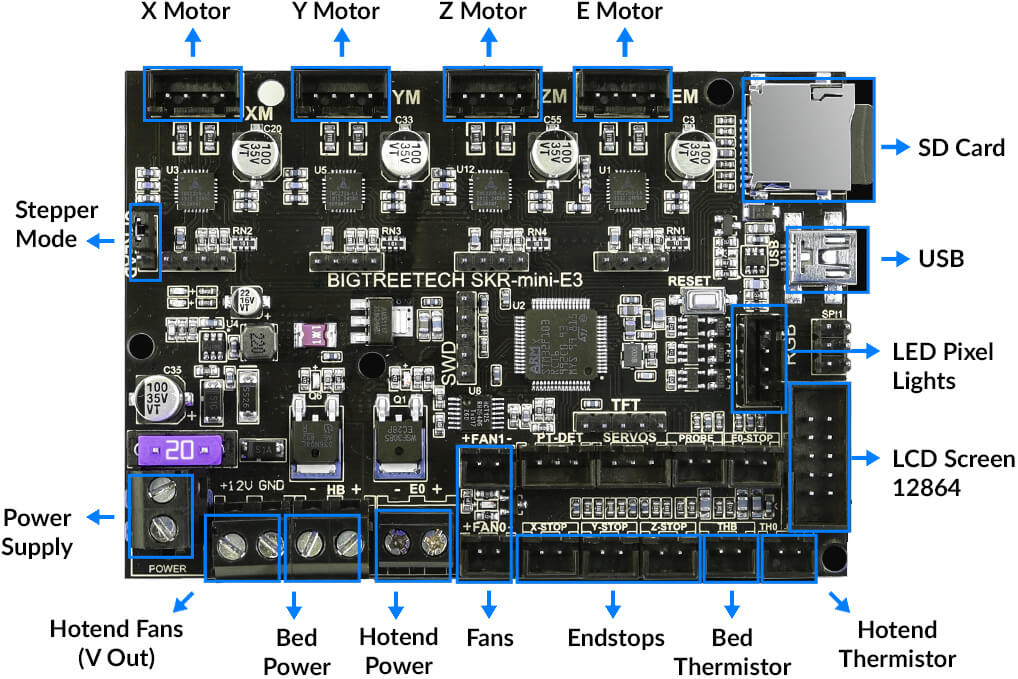
The SKR Mini E3 is an affordable, 32 bit board upgrade for the Ender-3 and Ender-5 3D Printers. The form factor (shape) and layout are an exact match to the original Creality boards, making it a simple drop-in replacement.
It comes with a blazing fast 32 bit ARM Cortex processor, the latest TMC 2209 silent stepper drivers for ultra quiet performance and pre-loaded with Marlin 2.0 firmware. No need to flash a bootloader or tinker with settings, just hook it up, turn it on and start 3D Printing.
Purchased Parts
SKR Mini E3 V2.0 Control Board - $34.99SKR Mini E3 vs Creality Board
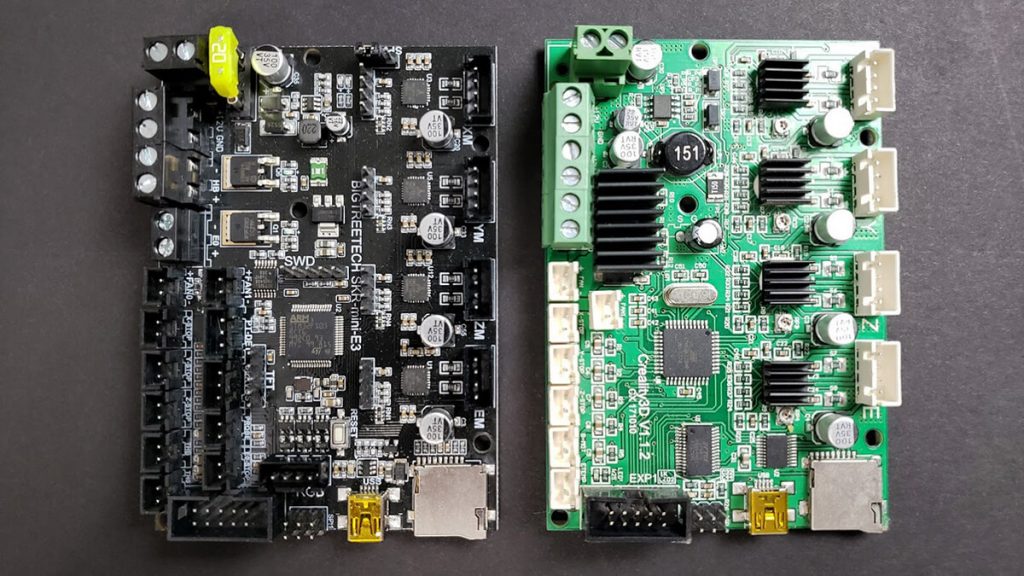
Creality 3D Printers like the Ender-3 are shipped with a basic 8-bit Melzi board, integrated A4988 stepper drivers and 128 Kb flash memory. That’s more than enough to get us started, and works just fine out of the box, but this is ancient hardware that is starting to show its age.
32 bit boards on the other hand have been available for years, but few people could justify the hefty $150+ price tag. That is where the budget family of SKR boards from BigTreeTech, specifically the SKR Mini E3, changed the industry over night.
These are now less expensive than the old 8-bit options, have more than 5x the processing speed, and at least twice the flash memory. That means we can enable more firmware features like auto bed leveling, linear advance and full color graphical displays.
8-bit vs 32-bit Processors
When we’re 3D Printing, constant commands from the G-Code file are sent to the board, telling it to move the nozzle from the current point A to the next point B. A basic 8-bit Melzi board with 16Mhz can handle straight lines (ex: cube) just fine, but more complex curve operations (ex: cylinder) require extra processing to figure out.
This can severely bottleneck performance on organic shapes, especially at faster print speeds, and ultimately creates visible artifacts and degradation in the object.
32-bit boards on the other hand, like the SKR Mini E3 with a 72Mhz chip, can handle these advanced calculations without a hitch. That means faster printing and better results, because the processor isn’t throttled while trying to figure out the next move.
A4988 vs TMC2209 Drivers
Stepper drivers are small chips that control how the stepper motors operate, sending electrical pulses that turn it to a certain degree. Because a half-step and full-step rotation is too large for the precision we need in 3D Printing, we use micro-stepping to make smaller rotations instead.
The generic A4988 drivers included on Creality boards are capable of up to 1/16th micro-stepping, meaning a full motor rotation can be segmented out in to 16 steps. In contrast, the latest TMC2209 drivers used on the SKR Mini E3 are capable of a whole 1/256 microsteps.
Unfortunately, due to factors outside of our control, the print resolution only gets a minimal improvement from this at best. However, when combined with other integrated features like StealthChop2, it does significantly help reduce the noise output of the motors during operation.
SKR Mini E3 Features
The massive hardware upgrades alone are more than enough to justify the price, but the SKR Mini E3 also comes with plenty of extra features. From auto bed leveling to 32-bit LCD color screens, it can save us time and money with further add-ons down the road.
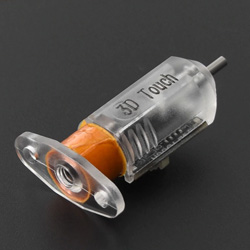
BLTouch
Servo and Probe ports are integrated on the board for native BLTouch support. No need to purchase an extra Pin 27 breakout board.
NeoPixel LED
Individually addressable LEDs (each light color can be changed) from AdaFruit can be plugged in to and controlled from the board.

SD Firmware
Flash new firmware updates direct from the SD card. Just upload the .bin file and on first boot, the firmware is automatically installed.

32 Bit TFT Screen
Replace that blue 80’s style display with a modernized 32 bit TFT color touchscreen. Supports serial and 12864 screen ports.
Installation Steps
Start by removing the electronics case cover using an M4 hex wrench. There are (3) bolts holding it in place, two in the front and one in the rear. Lift the cover off and place it in front of the machine, or better yet, just unplug the case fan from the board.
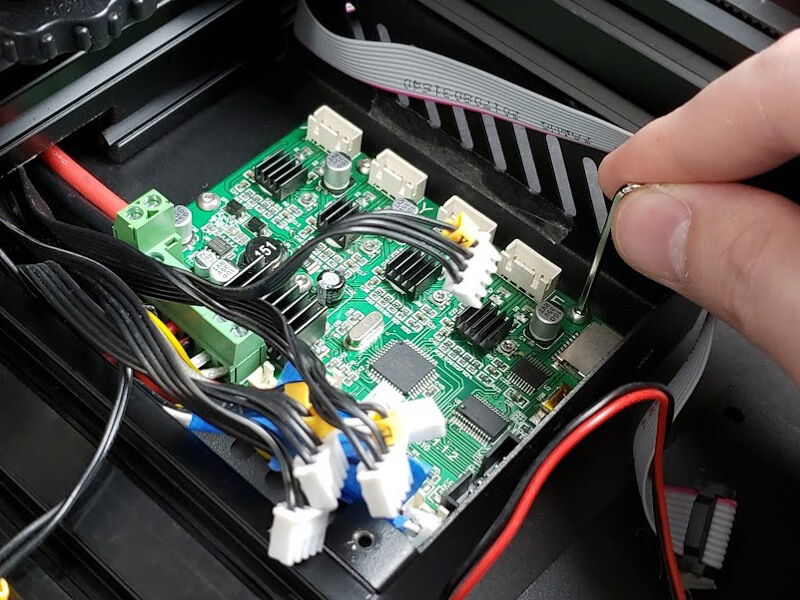
Now that we have access, we can start unplugging the various white JST connectors. 5-pin plugs are for the stepper motors, 2-pin plugs are for endstops, fans and thermistors. Most of these are labeled and easy to recognize, but I would suggest marking the rest. Wrap a piece of tape loosely around the wiring and write the plug’s name as shown on the board.

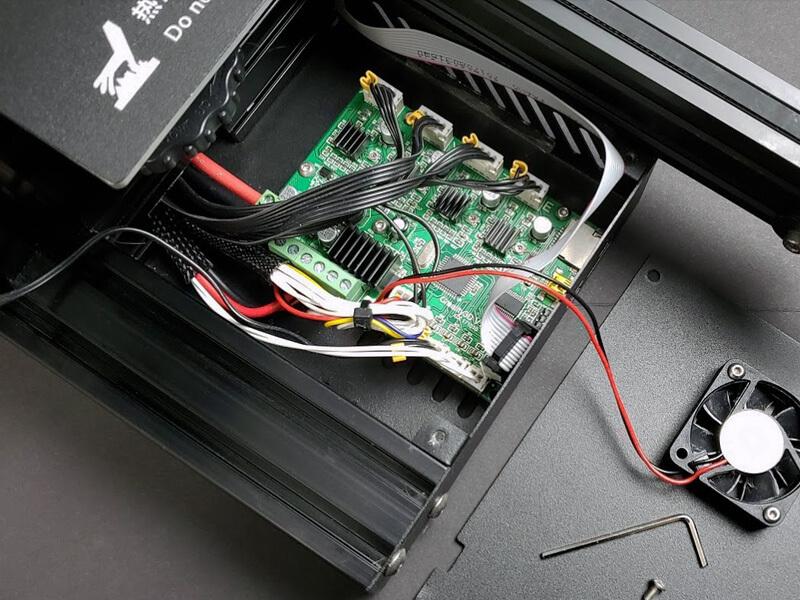
The (4) sets of power cables are different, using a clamping style terminal block to hold the wires in place. Take a flat head screwdriver and loosen the set screws on top, then pull the bare wire ends out of the housing.
Once all of the electrical connections have been removed, we can go ahead and unscrew the board from the case. There are (4) M3 bolts holding it in place, and once they are removed, just take it out and set it aside.
Wiring Diagram
Before we install the new SKR Mini E3 board, there are a couple things to take care of first.
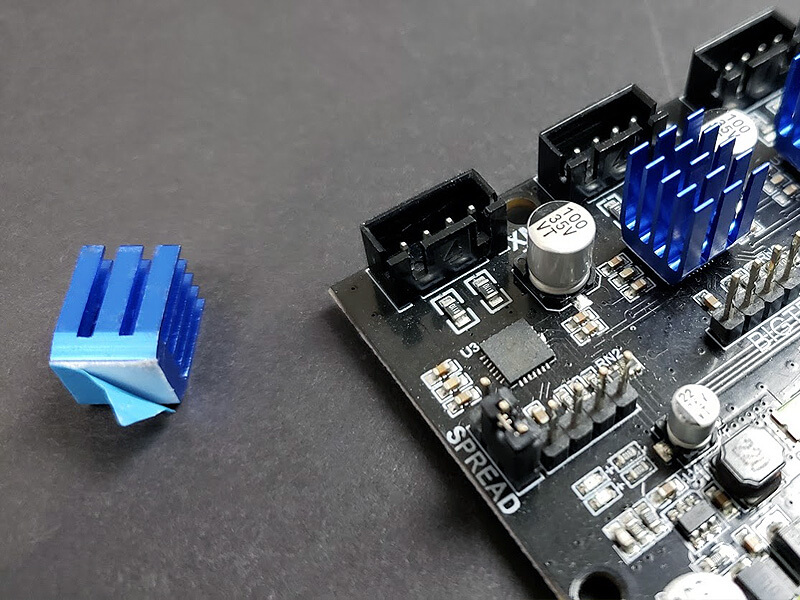
There are (4) blue aluminum heatsinks packaged separately in the box. Peel off the adhesive backing sticker and press fit these atop each of the stepper motor drivers. TMC drivers tend to run a bit more hot, where heatsinks help to dissipate the heat and prevents hardware failure.
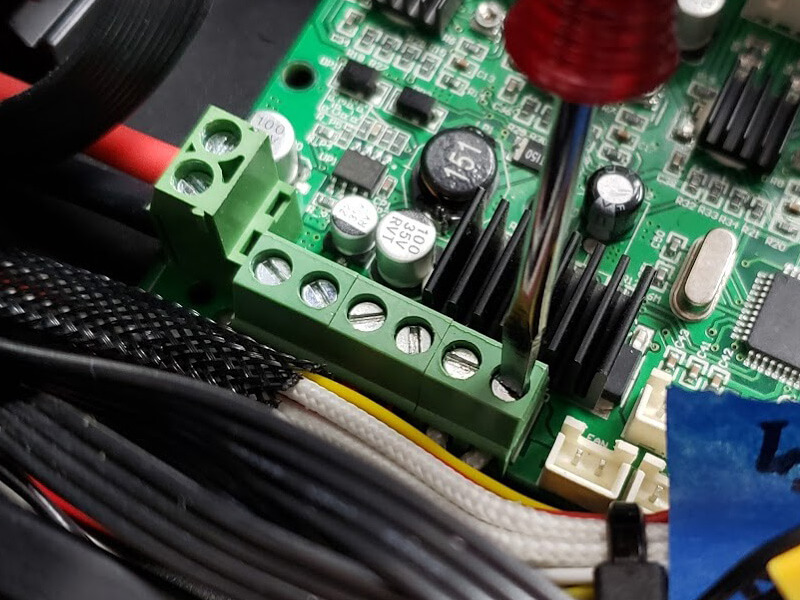
It’s also a good idea to check the terminal blocks, making sure that they are opened. With limited space to work once the board is in the electronics case, it helps having them ready to go.

At this point, it’s just a matter of installing the new SKR Mini E3 board and wiring it back up.
Before mounting it in the case, I would suggest plugging in the female XT60 power cables first. Because the terminal block is on the back side of the board, it can be a bit difficult to access otherwise. With these wires already inserted, we can just feed the plug through the rear opening in back of the case.
For the remaining wire terminal blocks, insert the cables and clamp them in place with the set screws. You can refer to the wiring diagram as needed, or do the following from left to right…
- +12V GND: thin 18 gauge red/black fan wires.
- HB: thick 14 gauge red/black heated bed power wires.
- E0: thick 14 gauge white/white (or red/red) hotend wires.


The only point to be wary is the fan plugs, which are reversed between the original Creality board and the SKR Mini E3.
If these aren’t swapped during the installation, the hotend cooling fan will always be turned on and have no PWM control. As such, FAN0 should have the yellow/blue wires for the hotend cooling fan, and FAN1 should be the red/black case fan wires.

That’s it for the installation and all it takes to upgrade the board. Once everything is plugged in, go ahead and power on the 3D Printer to make sure it works as expected.
Marlin Firmware
The SKR Mini E3 comes pre-loaded with Marlin 2.0 firmware on the SD card. This is an example build, configured for the Creality Ender 3 with most of the standard features enabled. It’s a convenient way to test our board and make sure it works, but the firmware is often an older version and should be updated when possible.
BIGTREETECH publishes the latest version of this firmware on their Github page, pre-compiled and ready to use. If you don’t need to make any changes, this is the easiest method.
BIGTREETECH SKR Mini E3 Github
Flashing the Firmware
There are 3 versions of the Marlin firmware available on Github. For users with a BLTouch auto bed leveling sensor installed, use the one labeled as such. Otherwise, firmware.bin file is intended for the standard Z-endstop switch on stock Ender 3 3D Printers.
- Download the firmware.bin file to your computer.
- Copy the firmware.bin file to your SD card (rename the file if necessary)
- Load the SD card in the 3D Printer and turn it on.
Once the 3D Printer has booted up, the screen should stay blue for 15-20 seconds. During this time, the Marlin firmware is being flashed to the board from our file. After it has completed, the screen should load in to the normal interface, signifying that it’s ready to use.
this is a great article but i cant get mine to run. i dont have a BLtouch and i cant find compiled firmware that doesnt have bltouch stuff added. do you have a firmware file that has ender 3 settings but no bltouch or anything else?
Hi Carlo,
BIGTREETECH has official firmware builds with both BLTouch and without. Here is the latest standard firmware build from their Github page. Just drop the file on the SD card, turn on the 3D Printer and wait until the blank screen changes to the normal interface, at which point it should be done flashing.
https://github.com/bigtreetech/BIGTREETECH-SKR-mini-E3/blob/master/firmware/V1.2/firmware.bin
This flashing method is working with stock board?
okk, i searching it in google, so you can delete all my comments :)
Hi Peter,
As others may have the same question, I will leave the answer here. This method of flashing firmware is a perk of the SKR Mini E3, it doesn’t work with the stock board. On the original Melzi board that comes with Creality machines, you must first flash a bootloader and then you can write new firmware over USB.
How would you install in a CR-10. I am having issues.
Hi Matthew,
What kind of issues are you having? I installed the SKR Mini E3 on my base model CR10 without any issues. I did have to build custom firmware with a couple slight changes (such as build volume dimensions) but otherwise it has worked great on that machine.
-Brett
I have installed the hardware successfully. The issue is I do not know how to update the firmware of the board for the CR-10. I tried the auto home and the motors tried to run away. My printer is stock. Did you use arduino software to update? What type of arduino board is this?
Hi Matthew,
With the SKR Mini E3 board, you need to place a compiled firmware binary file (firmware.bin) on the SD card. When the 3D Printer is turned on, it will detect this file and automatically flash it to the board. It takes around 20 seconds to complete, and once finished the file will be renamed (firmware.cur)
You’ll just need to get a firmware build made for the CR10, BIGTREETECH does not publish a version for this machine on their Github page. I’ve seen various bin files shared on social media groups in the past. Alternatively, you could also build it yourself, but this is a bit more complex of a topic.
-Brett
Hi Brett, I shorted out my melzi board (blew a lil chunk out of the onboard 24v/5v regulator, and fried 2 stepper drivers.) I chose to get an skr mini integrated version, arrived yesterday easy as to install, thanks to this guide. Prints so smooth an quiet. But when I tried to pause a print, it paused, but did not move the print head away from the print. When I resume, it happily resumes, but the screen stays stuck, and I have no access to controls, until the print is finished? Any help would be great.
My new board arrived today and I installed it without the slightest issue and it booted and worked perfectly after using this guide. The one thing I have yet to find is what are the correct speed settings to start printing at?
I have yet to figure out Sensorless Homing and Stealthchop/Hybrid setup as I don’t really want to start messing with VS Code and Platform.io until I can get a handle on and actually get something that will compile. Marlin 2.0_BugFix isn’t to bad and I’m intent on future upgrades to get my TH3D EZABL to work and even add a Second Z-AXIS Stepper and Leadscrew. My previous upgrades were to add the 3DFused Linear Bearing Kit on the X and Z-Axis. Other than the SKR Mini E3 V1.2, this was the best upgrade dollar I ever spent. I have my X and Z-Axis within .1mm of being perfectly aligned. Nobody I know of has got their X-Axis that level using stock wheels and adjusting nuts.
I installed a BIGTREETECH SKR Mini E3 V1.2 board in my Ender 3. I just noticed that it does not have the option to change filament anywhere in the printer options. I used to be able to change mid-print with the original board. It would back out the loaded filament, prompt to install new filament, heat up the hotend, and extrude a good amount to make sure everything is ok. Being able to do this mid-print was very helpful. How do I enable this option?
Hi Clint,
The Change Filament option is a Marlin firmware feature located in the Configuration_adv.h file. This is disabled by default in the SKR Mini E3 example firmware, but it’s
#define ADVANCED_PAUSE_FEATURE. You will need to un-comment that line (1675) and rebuild the firmware, or grab a pre-built BIN file from someone that has already done it.i have the skr mini E3 v 1.2 and the tft35 v3.0 that i want to install on my ender 3 pro i also have the ender 3pro extender kit from mark williamson 300x300x600 will these still plug and play or will i have to upgrade the firmware for the height and plate size, the 1.1.4 board that was in my ender 3 pro i want to put into my ender 2 with the stock lcd from e3 pro will i have to update the firmware for this also.
Hi Callum,
You will need to update the firmware on whatever board you use to define the new build volume size. These are located in the Configuration.h file on Marlin.
#define X_BED_SIZE 235#define Y_BED_SIZE 235
I don’t have the TFT35 screen as of yet, but I believe the stock SKR Mini E3 firmware is configured to use the default screen. In the Configuration.h you will find it set as
#define CR10_STOCKDISPLAY. You may have to change this to support a TFT screen instead, although I will have to look up the details and add them here once confirmed.Just installed an SKR mini E3 1.2 and downloaded the firmware with BL Touch and loaded it but I cannot get the printhead to go below 0.0 on the Z axis (no negative numbers) to calibrate the BL Touch? Any suggestions? Using a TFT 35 E3 V3 and it won’t go below 0.0 in either Marlin or the TFT.
Hi Mike,
My BL Touch is sitting here and will be installed soon, but I haven’t actually used it as of yet. Most of my machines have custom ABL configurations that I covered in a different guide, but you can check out my article How to Calibrate an Auto Bed Leveling (ABL) Sensor and hopefully that will point you in the right direction.
-Brett
My new mini e3 isn’t probing correctly for bed leveling. It tries to start probing next to the X endstop which is off of the bed. Usually on the stock board it will start it’s probing on the other side of the printer.i can’t find anything in Marlin to fix it
Hi Steven,
Check out the Z_SAFE_HOMING option in Marlin firmware. It’s disabled by default on the SKR Mini E3 firmware, but this feature is designed to prevent homing outside of the build area. When I assembled a DIY auto bed leveling system in another guide, this is the setting I used to work around that problem myself.
-Brett
Hey Brett thanks for the reply. I have that turned on already. I literally looked at every line in Marlin, but that doesn’t mean I didn’t miss anything. I’ll keep looking
Hi Steven,
I went back and took a look at the firmware configuration I made and noticed a couple of things. Most notably, I created outer boundaries for the probe, but these settings don’t even exist in the official SKR Mini E3 firmware, you would have to add them. You can take a look at my config file here lines 1021 – 1024.
#define LEFT_PROBE_BED_POSITION 10#define RIGHT_PROBE_BED_POSITION 170
#define FRONT_PROBE_BED_POSITION 30
#define BACK_PROBE_BED_POSITION 190
I also defined X_BED_SIZE and Y_BED_SIZE as 220 (build volume) instead of 235 (bed size), which are used by Z_SAFE_HOMING and several other settings. Try the aforementioned boundary definitions first, as changing the BED_SIZE variables was probably a workaround, but you can always give it a shot if all else fails.
-Brett
I believe your image called “skr_mini_e3_wire_terminals.jpg” showing the red/black wires, directly above the “The only point to be wary…” paragraph shows the HB red/black reversed. In fact, on the board vs what BTT’s diagram shows is also backwards:
https://github.com/bigtreetech/BIGTREETECH-SKR-mini-E3/blob/master/hardware/BTT%20SKR%20MINI%20E3%20V1.2/BTT%20SKR%20MINI%20E3%20V1.2PIN.pdf
For the “BED” connection, it shows “12/24V, PC9” but directly above that wire block it shows “- HB +”
I guess it’s just a resistor which heats the bed so it doesn’t matter if +/- are swapped, but that’s pretty disconcerting. Hm, seems the same for the “HE0” connection to the right of “BED” in that diagram.
Upggraded to the BTT SKR E3 mini V1.2 and the TFT35 E3 V3.0 screen. Pretty sure I connected everything right (even googled the exact fitting of the RS232 on the board since that wasn’t so clear on the youtube video you linked) but when I switched my Ender-3 on I was immediatly greated by 2 white lines across the screen and a No printer attached message. Tried different SD-cards to flash screen firmware but nothing happens when i switch it back on. This is what the screen looks like : https://imgur.com/lkngtS2
Just realized the board can also work with the original screen. Tested it and printer works. The absence of sound when the axis move is fantastic. Too bad about the screen. I’ll try and contact BTT for a replacement. :/
I had this same problem. BTT’s PIN diagram for the display board is shown from the front view. The SKR mini E3 board PIN diagram is shown from the rear view.
I reversed the wires and it worked perfectly.
The board worked okay initially, but after flashing the firmware I now can’t connect to the screen and get the red ‘no printer attached’ message. I’ve tried reversing screen connections and looked around for a solution on the forums but most solutions seem to involve editing and compiling your own binaries, which is beyond me. I thought this was supposed to be a ‘direct replacement’ for the original Ender board but it’s actually a real headache. Well, it powers up at least. I’m gutted as I’ve only had the printer for a week or so and was just starting to get some great results.
Hi there,
I found your article and site while trying to troubleshoot my new SKR mini E3 board for my ender 3.
I’ve gotten it installed and I can’t get past one problem. I’ve gotten it to boot and I’ve loaded the v1.2 firmware per some of the above comments. But I can’t get it to see anything that’s sliced on the SD card. I’m totally lost at this point if you’re able to provide any help.
It’s a stock ender 3, no BL touch, the firmware appears to be the correct version from what I can see. The menu functions work correctly with regards to moving axis, etc, which are now incredibly quiet compared to my stock board… I just can’t load a file to print.
Thanks,
Jason
If you are using VS Code to compile your firmware go to line 1609 and make sure that there are no forward Slashes in front of Define SD Card Support. Or when in Config.h hit Control + F and do the same thing. If it isn’t turned on the SKR Mini E3 can’t see it.
Just checked… define SD card support is turned on.
In configuration.h anyway… is there anywhere else I would find this setting?
I’d also try SD_Check_And_Retry as well as SDSUPPORT and if all else fails SD SPI speed settings though I don’t know why you would have too. Do one at a time, but before you do that make sure the SD Card Isn’t more than 32 GBs in size and it says Class 10 on it. I usually use Kingston or Lexar Mini SD Cards. The one that came with your Ender 3 is just about useless for anything other than holding the Manual and maybe Printrun which is the maker of Pronterface. Other than that, I’d get in touch with BigTreeTech and you have to go through their Facebook Page to get Tech Support.
Following these steps everything goes fine until I do the firmware flash. After Marlin boots, I get a “TMC CONNECTION ERROR” that I can’t figure out how to get rid of.
I’m using the DIP board so ver1.0 and downloaded the 1.0 version. Is there some other change I have to make in the firmware from what’s in there?
Great guide, saved my ass today . One thing I noticed, the hotbed wires are also the other way around to my creality board..
Also, after turning on everything works except my extruder. It seems to have no movement at all. If I switch E and Z I can get it working by advancing the z axis.
I am thinking the driver might be duff…any ideas? Sadly it’s a few months since ordering and it was from China so I guess I am stuffed.
Make sure you have the Extruder plugged into E0 and the Firmware is set up as such. Now if after everything has been gone through and it still won’t function. Try switching the Extruder over to E1 and go through the same previous steps in the firmware.
I have also upgraded my Ender 3 with the SKR E3 mini v1.2 & the TFT 35 E3 v3.0 boards. I got the “printer no attached” error message, but the Ender is printing fine. Just love how quiet it is (except for the noisy fans – that will be a job for later). Today I flashed the latest firmware from BigTreeTech ( v1.2), but, I am still getting the no printer error message. I have looked at countless YT video’s & forums, but all seem to concentrate on changing the baud rate, and/or rolling your own firmware.bin file – tried that, but had so many problems, so gave that up. The new firmware that I flashed today, is the latest designed for the Ender 3 with all the upgrades as mentioned above. I am at a loss as to why I am getting the no printer error message. Anybody having the same problem, or, has anybody have an answer ?. As mentioned, the printer is printing just fine, and I even got the led light in the knob to turn on when starting the printer.
I have the same problem. White lines, no printer. Tried everything I’ve read on many sites and YouTube’s. Post if you solve problem. Upsetting, buying motherboard and TFT from same company you would think their act would be together. Nada.
I reversed the 5 wires, golden. Working fine now….
I had this issue until I updated the firmware for the tft screen. Also, if you’re getting white lines, try reversing the 5 pin connector on the tft
Why i install everything on the place.
Skr mini 1.2 e3 and also tft screen i have bltouch but everything is not work
I have have had the same issue and it usually is the TFT. I would first attempt to use the Stock LCD fist before anything else. I actually gave up with it and mine now works perfectly.
Hi many thanks good work. I have problem with SKR MINI E3 V1.2 on my ENDER3.
I instaled firmware from above adresse, my firmware and I still problem with temperature. When I print from SD card my printer keeps repeating auto home and temperature is still rising. ( I have set temperature END-200°C and Bed-50°C ) I have on bed 120° and still rising and Hotend is 120°C. Do you have some idea where is problem? I’m in the end.
Many thanks Petr
Hi Petr,
There is a new defect with the latest batch of SKR Mini E3 boards, which sounds to possibly be the case with the one you received. Several of them have been shipped with poor soldering on the MOSFET pads, which results in them continuing to heat past the desired temperature. If you’re handy with a soldering iron, you may be able to clean this up yourself, but I would recommend returning it and exchanging for a new board. This is a manufacturing problem and is something they are responsible for fixing.
-Brett
I have one problem with firmware update on my skr mini e3 v 1.2 on Ender 3 pro.
I have copied the latest compilation of firmware from GIT to SD card. I have switched-on the printer with SD card in SD port and it seems that firmware is updated. Printer works fantastic and is very silent (I can hear fans, only). But when I switch-off my printer and switch it on again but without SD card it works very loudly. On LCD screen there is a message “Ender 3 – ready” and firmware version seems to be new one. So it all seems to be ok, but that nois After restarting the printer with the SD card, it works quietly again. What should I do?
Did you enable EEPROM in the Firmware? There was a Subset in the Section of Config_adv.h that made the EEPROM also use the full available Ram. 512K instead of the 128K that the MPU was listed as having on mine. Once I made sure this extra step was enabled along with the EEPROM, a similar error that I was receiving went away. If I remember correctly it was the next command after enabling the EEPROM.
I have just copied firmware.bin file from
https://github.com/bigtreetech/BIGTREETECH-SKR-mini-E3/tree/master/firmware/V1.2
I have not made my own compilation.
I have investigated the problem in more details. After “Initialize EPROM” and rebooting printer works good, even without SD card. Then I wanted to change settings of steps/mm for motors. After that printer worked fine. But after command Store Settings and rebooting the printer became noisy, again
I don’t understand why you rebooted after Store Settings. This Marlin not Windows, you shouldn’t have to reboot. Try Loosening the screws that hold the Leadscrew Nut and try letting the nut Float to see if that gets rid of the noise and spray some Silicone or White Lithium Grease at the joint. Also mine became really noisy when I changed the Steps Per as the TMC2009’s are expecting a certain Steps per or it changes the Frequency and mine became way to fast. Went back to stock settings and the noise went away. You should also change the VREF to 650 on X, Y and Z. with 750 for the Extruder.
Writing Reboot – I mean switch it off and switch it on. I don’t want printer be ON all the time. After changing steps/mm but without restarting printer it works fine – no noise and very good precision. After switch-off switch-on I loose those steeps/mm settings but printer is silent. So I change settings and want to store them by “Store settings”. As a result I have my settings stored and active after switch-off-on but I have noise after that. I will try to make my own compilation of firmware and I will check the settings You have mentioned. Maybe it will help. Thank You very much.
There is a new update I was just notified of the SKR Mini E3 the files necessary are on Thingverse. In the Thingverse Search Bar type 4155355 and it will show Monoprice Select Mini v1.2 Ultimate Upgrades. Make sure you read the main file at the bottom as well as there is a update to the EEPROM.
ok , I am going insane with these stupid motherboards,
had an skr mini e3 in my ender 3 pro and it worked fine, did something stupid and fried the board, have now 2 replacements have tried both, when they are plugged in i have no thermistors and heat, not registering or doing anything. i put the original ender 3 board in, thermistors and heaters work fine, at a loss for what it could be, as i remember installing the first one and having no issues, i even updated it with my firmware and nothing, its like the thermistors and heaters aren’t attached at all, checked and double checked the wiring everything is correct
Hello I have a quick question? The board is amazing. I got a mks tft 28 for like a few bucks. Would this work with the skr mini e3
Installed the SKR Mini v1.2 board in an Ender-3 and installed the BLtouch (2.0.5.3 not z-stop) firmware, but where does the BLtouch v3.1 3-wire header plug in? I tried servos both ways and the screen and power LED remain off til the header is unplugged. Plugging into PT-DET does cause the plunger to cycle, but not be controlled.
If I have to go back to Z-stop, I’ll take it with this lack of noise.
Ended up having to swap the red and blue wires in the connector. Works great now!
Hey danny vercruyssen, the 4pin and 1 pin DuPont connections for the tft35 is backwards, flip it around and the tft screen will work just fine. Mine was like yours and then realized it was backwards.
How do I edit the firmware to reverse the extruder stepper for a Titan aero? What way do I edit this? Ardurino doesn’t seem to want to upload to the board.
I think you would build the new firmware file locally, name it firmware.bin, put it on a (Micro)SD card in the slot and boot the printer. The printer handles it form there.
I don’t know how to do that? If there a guide I could read?
You should not embark on this kind of modification if you do not inquire before.
Flashing a motherboard is not complicated, but it requires a minimum of knowledge. This knowledge is available to anyone who wants it. But you have to leave with a spirit of discovery and not go defeatist (it’s too complicated, I understand nothing …).
If after watching several videos and tutorial you tell yourself that I don’t understand anything, don’t do it and buy a prusa printer.
It has to be compiled in VS Code available for free from Microsoft. you will also need to downlaod and install Platform.io. There are dozens of Videos on YouTube. The easiest way is to go tho Kay3D.com and download Cheetah 5.0 and read the Guide as you proceed to compile the Firmware.
I followed the instructions above and the screen just stays blank and blue indefinitely. I cant tell if the firmware is flashed or not. I cant even get it to reload the original firmware that my mini e3 board came with.
Any suggestions?
Unplug everything but the screen and the rear power terminals to verify the board works when powered, then add one thing back at a time and power it up to narrow down where the issue lies.
For me, it was the BLtouch wiring not matching between stock and BTT boards (Swap red/blue pins in the connector)
Thank you so much for this article. I have been trying to do this watching youtube for 2 days now. Ender 3 flashed with new Marlin.2.0.5. in under 15 minutes. Now back to the fun filled world of 3D printing. Thanks again keep up the great work
I know that this question has been asked countless times, but, after upgrading main board to BTT-SKR-mini-E3 v1.2 and screen to BTT TFT35-E3 v3.0, my Ender3 prints very well (so quiet), just get the error message “no printer attached” at start-up. I downloaded & used BTT’s Ender 3 firmware, which is supposed to display “Ender 3” as the printer. Has anybody had the same problem?.
Do you have it connected via the “RS232” header? Mine starts off saying that for about 10 seconds then goes away. If you have also connected the EXP3 cable, hold the rotary dial down and switch modes to see “Ender-3” on the screen. You can run both the TFT and original screens at the same time, no need to switch modes.
ive just installed the btt skr mini v1.2
the problem im having is the bed wont stop heating.
ive even switched back to the original board and that is now dooing the same thing!
any ideas anyone please
Hi Brendon,
I would first check your wiring and make sure the bed’s power cables are connected to the right spot. I vaguely remember this happening when someone clamped them into the wrong terminal. Otherwise, you will most likely need to return/exchange the board. This can also happen if the MOSFET has failed, in which case it should be replaced.
-Brett
Thanks for the reply, I’m thinking I may of wited it wrong, as it’s happening on the original board too, have tried different wire configurations though,
If I swap the hot end and the bed plug the hot end heats up without control
have any explanation of how to install an inductive pnp sensor with octacoupler 12 on skr mini e3 v1.2?
Does this fine guide apply exactly to the V1.2 board?
Hello,
This guide was actually written for the SKR Mini E3 V1.2. It is however also applicable to the V2 as well, where the board itself really hasn’t changed in terms of usage. The major differences are they now include an onboard EEPROM, added support for dual Z motors and improved passive cooling on the integrated TMC2209 stepper drivers.
-Brett
Hi mate, I tried to flash the firmware but now it just has a blue screen. I grabbed the original firmware that came with the board but I put it into the micro as slot and nothing happens. Is there a way to hard reset the board? Or do I need to leave it in for hours? All the videos show it being pretty instant
Update .. leaving the card in for a few hours and it does seem to boot (seems super slow) I’m thinking that the firmware maybe over writing the space for the EEPROM .. would that do something like this?
Cheers
I installed the SKR MINI V2.0 on my Ender 5 which is said to be plug and play and it apparently is not. Now when trying to move any axis it will only go in one direction. When homing it bangs into the end stops and keeps trying to go to the point where it’s gives me an error. Also when trying to home the Z moves down very slow and does not allow me to move the bed up. I see that most of these articles focus on the Ender 3 and all say that the 3 and 5 are pretty much the same. Can someone either direct me to an article focused on the Ender 5 or give me directions on fixing this problem. I’m at the point where I just wanna return the board.
Hi Renault,
The SKR Mini E3 is compatible with both the Ender 3 and Ender 5, but it comes pre-loaded with Ender 3 firmware from the factory.
You will need to flash the Ender-5 firmware on the board to use it. Download this firmware.bin file from the BIGTREETECH Github page, place it on your SD card and turn the 3D Printer on. It will have a blue screen for about 20 seconds while the process is completed, and then it should operate as expected.
-Brett
Thank you for your help. I’ll do that as soon as I get home.
Did it work ?
I’m want to buy this card. just because I’m paranoid when we say Ender3 this includes ender3 pro?????
Hi Jerry,
That is correct. The differences between the Ender 3 and Pro are negligible, they share almost the exact same parts. The Pro just has a different power supply (Meanwell), thicker Y axis (4040) and a different build surface. Almost all Creality 3D Printers use the same board, and the SKR Mini E3 V2 is a drop-in upgrade for these. It will also work on the Ender 5, CR10, etc.
-Brett
I have installed a filament run-out sensor on my old Ender 3 board, can the sensor be re-installed on the SKR-mini E3?
Yes it can, though if you have the BTT TFT 3.0 E3 v2 it makes it a lot easier as it has a dedicated plug outlet for it.
Hello,
I refuse to jubilate my Ender-2. ;-)
I installed the SKR MINI V1.2 on my Ender2.
I’m not good with codes, someone will have the firmware for this printer. Thanks
The bed power cables are switched in the picture.
Hi Andrew,
The only photo showing the bed power cables is correct according to the wiring diagram. Positive (+) on the right side and Negative (-) on the left side. Am I overlooking something?
-Brett
He seguido todos los pasos y instalado mi nueva placa skr-mini e3 v 2.0 pero me sale la pantalla azul y no me sale nada, eso a que se debe ??
Translation (added by admin): I have followed all the steps and installed my new skr-mini e3 v 2.0 board but I get a blue screen and nothing comes out, why is that?
Hi Adrian,
Are you using the SD card that was included with the SKR board? This is preloaded with firmware for the Ender 3. If there is a bluescreen, it sounds like there maybe an SD card or firmware problem, where I would suggest downloading the latest firmware.bin file from the BTT Github and loading that on the board.
-Brett
Hello Brett. First of all, your post is huge. Images, text, anything is really crystal clear.
By the way I’ve still a couple of questions for you.
1) I’m planning to replace my stock ender 3 v1 mainboard due to swapped cables on estepper (and fried driver). The one I choosed is the SKR mini with the socket, capable of driver substitution. I guess is the same of you post with this “mechanical” feature. Isn’t it?
2) I’ve upgraded my original feeder with a BMG clone. Due to this upgrade (swapping direction), I’ve fried the driver. This main board is able to fast load and unload the filament whit the script o builtin function?
Thank you very, very much.
Davide
Hi Davide,
Thanks so much for the kind feedback!
1) Are you referring to the SKR E3 DIP board? If so, it’s very similar to the SKR Mini E3 shown here, but it has open driver sockets as you mentioned. Otherwise, I believe these two boards are almost identical.
2) The filament load/unload option you’re referring to is a Marlin firmware feature, not board specific. I can’t say for sure if that’s enabled in the default BIGTREETECH build, but if not, it’s very easy to flash your own custom firmware to the board from the SD card.
-Brett
Hello,
Will this work on an Ender 3x?
I was thinking of getting stepper motor dampers, since those seem easier to install – but then I read that they can’t be installed on every Ender3 printer.
Mainly lookin to get rid of the screeching, so I can run the printer longer than 3 hours at a time
Thanks for the guide any info you could provide!
Dee
Hi Dee,
The SKR Mini E3 V2 should work just fine with the Ender 3x.
-Brett
Hello Brett,
Didn’t get notified you replied, thanks for getting back to me!
I took the jump and installed it, was a bit confused when I opened up the printer and was greeted by a hot (glue) mess, but with some cable wiggling and gently pulling the glue with pliers I managed to get everything out.
One small ‘snag’ I bumped into was that the V 2.0 board has two Z-motor connections, couldn’t find much info on it (then again I don’t know where to look, bit of a casual printer) but either of these should work. I used the ZAM and printer seems to be working fine, no more stopper noises – all I can hear is the fans.
Thanks again for this guide, made the installation a lot less daunting
Hi Dee,
No worries! Creality started gluing the connections a while back, presumably to prevent loosening during transport. It’s a bit of a hassle, but with some of that finesse you mentioned, it’s not too bad.
The earlier boards (SKR Mini E3 V1.2) only had one Z motor connection, intended specifically for the Ender 3. As these boards became popular with a variety of other 3D Printers, some of which had dual Z axis, they added support for this in the newer revision. ZAM is stepper motor #1, and ZBM is stepper motor #2 (when applicable).
I’m glad to hear it’s working well for you. Once you replace those fans with quieter ones, you won’t even know the 3D Printer is turned on.
-Brett
Thanks for the tip Brett,
I’ll look into that if the fan noise becomes too much, since I have it set up in my home office.
Might want to upgrade the squeeky extruder at some point too.
Happy holidays!
Kind regards,
Dee
Hello, I recently purchased a BTT SKR MINI E3 V2.0. I installed all the wiring and when I powered it on I was greeted with nonstop beeping and a black LCD screen.. now what?
same thing here sir .. did you find the problem?
i have done everything.. but then it is startet is have a high pitch noise at all times and black display.. it only stops then i disconnet the cable to the display.. on the board it self have 2 red dioder says power and status.. all cables is correct because is it almost the same board as the old,
:/
I am having a similar issue. Purchased the SKR MINI E3 V2 and installed in my Ender 3 v2. I can power it on, set to Home and it works fine. When I print, it will print the test line and when it goes to start the skirt, it stops and I get a solid tone (Solid beeping tone). I have to power the printer off to get it to go away. When I turn it back on, everything will work fine until I try to print again.
Any suggestions are much appreciated.
Thanks – Mike
Hi Mike,
I could be wrong, but I believe this is a known issue with the Ender 3 V2. Creality changed the type of screen used and didn’t release the modified Marlin source code. The Marlin developers were trying to reverse engineer this last time I checked, but I haven’t followed up on it in a while.
Checking the Github page, it looks like they have an example Configuration.h file published for the V2 now, where I would recompile the firmware using that and see if it fixes the problem.
-Brett
I have a stock ended 3 just upgraded the board and screen. Can’t get to add firmware and test print is only a small few lines across the top
Hi James,
To update the firmware, you should be able to place a compiled “firmware.bin” file on the SD card, restart the 3D Printer and the rest is automated. The flashing process takes about 20 seconds and will sit at a blue screen until it’s complete. If that’s not working, try using a different micro SD card. The card included with the SKR boards isn’t very reliable, where this may have already failed.
-Brett
Thanks for the detailed guide. I followed your steps carefully and could replace my original broken mainboard with success. And wowww the silence of the v2 is really weird when your used to the continuous humming of the steppers.
Hi Jelle,
A silent board is the best quality of life upgrade in my opinion, something you don’t realize you need until you try it. I never minded the robot song, but I certainly don’t miss it. Now the only problem is there is nothing to distract from the fan noise, where my next guide will aim to replace those with similarly quiet options.
-Brett
Hi All,
Can someone please help me with a step-by-step guide to installing the BTT SKR Mini E3 V2 mainboard and latest Marlin firmware suitable for my stock Ender-5 ? I have seen a lot of articles on how-to for Ender-3 but not for Ender-5. Maybe the process is almost the same as with Ender-3 with very few deviations and I want to make sure these few steps are done right so that my printer works as desired. Sorry, but I am fairly new to this game.
Your help will be much appreciated !
Hello,
Just download this file from the BIGTREETECH Github page, rename it from “firmware-ender5.bin” to “firmware.bin”, then place it on an SD card. When you turn the 3D Printer on, it should recognize the file and automatically flash it, giving you a blue screen for about 20 seconds while it completes.
This won’t be the latest Marlin build, it was built about 6 months ago. If you need the absolute latest Marlin release for some reason, you’ll have to compile your own firmware.bin or have someone do it for you.
-Brett
Thanks Brett ! Will try it out this weekend.
I just ordered the skr e3 mini v2.0 + tft35 to install into my sunlu s8. The end stops on the sunlu are 3 pin connectors with two wires but the e3 mini is a 2 pin connector. Any advice?
Installed The SKR Mini E3 V3.0 when getting my Z to 0.00 and try set the offest it will not go into (-) negative numbers. It wont go down past 0. Do i need disable something to set the Z offset or just do it with Z probe offset?
Odd your BTT SKR E3 DIP looks so different to my SKR E3 DIP v1.1 Google says this is a SKR E3 DIP board when I was Searching for wiring a Creality CR Touch Leveling
Hi Pablo,
The board in this guide is an SKR Mini E3 V2. I don’t remember much about the DIP since it wasn’t around too long, but I believe it’s the same board (or similar) with open driver sockets. The SKR Mini seen here came with soldered TMC drivers that couldn’t be removed.
– Brett