PETG filament is perhaps the most balanced material choice for 3D printing. It’s nearly as easy to print as PLA, but significantly stronger and more heat-resistant. Unlike ABS, it doesn’t warp or produce harsh fumes, making it ideal for home workshops and professional environments.
Still, there can be some challenges when dialing in your first PETG slicer profile. This guide looks at what we need to know when getting started. Small adjustments can make a world of difference, from the fan speed to print temperatures. With the proper settings and hardware, it might just replace PLA as your preferred choice!
What is PETG?
PETG is a modified version of Polyethylene Terephthalate (PET), the plastic used for water bottles, food packaging and so much more. The addition of Glycol (G) makes this variant far easier to print, increasing the flexibility and impact resistance while reducing brittleness and hazing.
Comparable to PLA’s ease of use, and offering the same strength and durability as ABS, it has the best characteristics of both materials rolled into one. It is however hydroscopic, meaning it will actively absorb moisture from the air that can affect prints.
Proper filament storage is an absolute must in humid environments. Spools that have already absorbed moisture can be restored with a DIY filament dryer (How to Make a Filament Dryer for $30).
PETG Print Temperature Settings
PETG filament requires higher temperatures than PLA, typically printing best at 245°C nozzle and 85°C bed. The exact range depends on your hotend type and specific filament brand.
Quick Start Settings
- Nozzle Temperature: 245°C
- Bed Temperature: 85°C
- First Layer: same temperatures – slower speed
Full Temperature Ranges by Hotend
- PTFE-Lined Hotends: 230-240°C (safe for most PETG brands)
- All-Metal Hotends: 230-260°C (full range for optimal tuning)
- High-Speed PETG: May require 250°C or higher (all-metal hotend recommended)
Temperature Troubleshooting
- Too cold (under 240°C): Poor layer adhesion, delamination, weak prints
- Too hot (over 250°C): Excessive stringing, oozing, blobbing, heat creep
As with any new filament, print a temperature tower first. This shows how the material looks, feels, and prints at incremental temperatures. Too cold causes poor layer adhesion and delamination. Too hot leads to excessive stringing, oozing, and blobbing.
Pro Tip: If print temperatures fluctuate, run a PID tune on your hotend. This recalibrates the Kp, Ki, and Kd values for your specific hardware, stabilizing temperature readings for consistent results.
Best PETG Filament Brands in 2025
The PETG market has changed significantly as of late, with new companies and improved formulas making filament selection both easier and more complex. Here are the top choices for different needs and budgets:
Best Overall Value: Overture PETG
Overture remains the top choice for budget-conscious users, offering excellent quality control with full mechanical winding to prevent tangles. At around $20-25 per kilogram, it delivers consistent diameter tolerance and produces minimal fumes while printing, making it ideal for home use. The glossy finish and reliable performance make it perfect for both beginners and experienced users.
Premium Choice: Polymaker PolyLite PETG
Polymaker is widely considered the gold standard for filament, and their PolyLite PETG offers exceptional quality and ease of use. While more expensive than most competitors, it provides superior layer adhesion and dimensional accuracy that often justifies the cost.
Excellent Value: FlashForge PETG
FlashForge PETG offers outstanding reliability at around $22 per kilogram with consistently high user ratings (4.4-4.6 stars). Available through Amazon with fast shipping, it provides excellent dimensional accuracy and smooth printing with minimal stringing. The color selection is impressive, and the filament works reliably across different printer brands without special preparation requirements.
Reliable Alternatives
eSUN PETG: Known for their wide color selection including glow-in-the-dark options, with good moisture resistance straight from the packaging.
Hatchbox PETG: A solid choice with consistent quality, though supply chain can be inconsistent at times.
What to Avoid
- No-name bargain brands with poor diameter consistency
- AmazonBasics PETG due to spooling issues and quality control problems
- Any filament without proper moisture protection packaging
First-time PETG users should start with Overture or FlashForge to dial in settings, then experiment with PolyLite once comfortable with the material.
Build Surface and Bed Adhesion
Bed adhesion is rarely an issue with PETG. In fact, it can often stick too well, to the point of causing damage to the build surface. The key is choosing the right build surface to balance strong first-layer adhesion with easy part removal afterwards.
Best Build Surfaces for PETG
- Powder-coated PEI sheets: The ideal balance of adhesion and release
- Garolite (G10): Professional choice with excellent chemical resistance
- Glass Beds: Excellent for large prints, use glue stick for easier removal
- Blue painter’s tape: Old school, budget option that still works extremely well
Z-Offset Considerations
If using automatic bed leveling, PETG typically needs a slightly higher Z-offset than PLA (about +0.05mm to +0.1mm). This prevents over-squishing that can lead to poor flow and adhesion issues. Most modern slicers include PETG-specific first layer settings that account for this.


PETG Fan Speeds
Does PETG need a cooling fan? No, it will print anywhere from 0-100% fan speed depending on your intended goal. The amount of cooling should be chosen based on the purpose of the part.
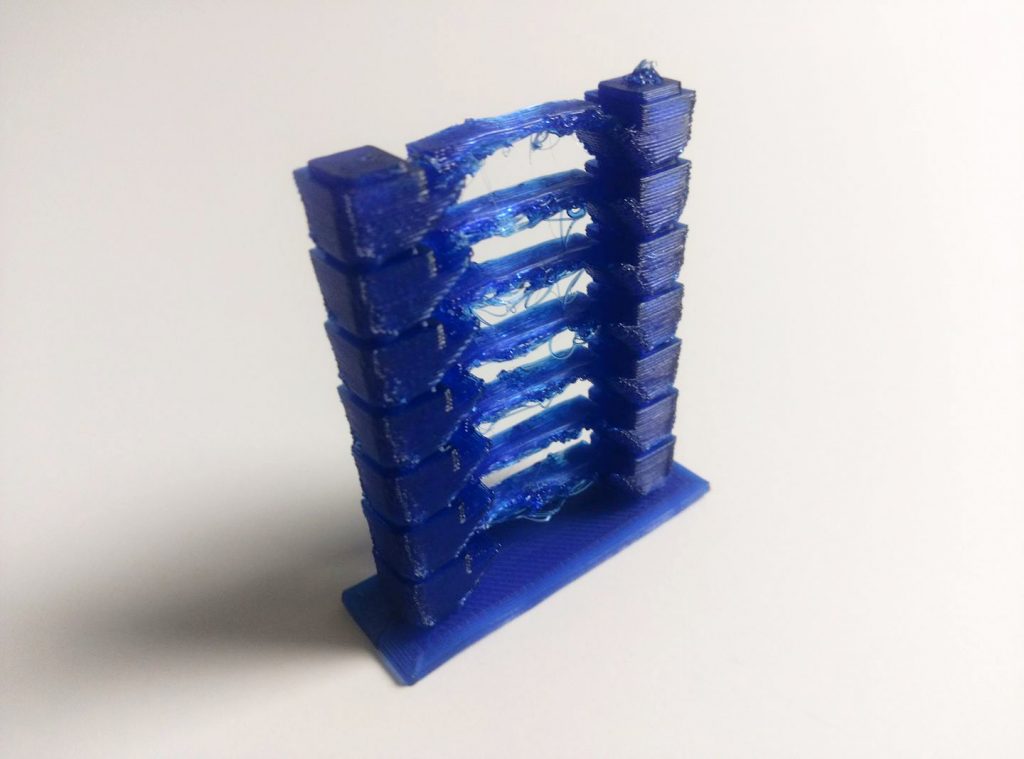
Low Fan Speed: The less cooling used, the stronger the part will be. The molten plastic essentially melts into the previous layers, providing exceptional adhesion to one another. The downside is that this can lower the aesthetic quality, a trade off for much stronger parts.
As can be seen in the image, bridges and overhangs will suffer the most without proper cooling. To address this problem, it is recommended to use the Bridging Fan Speed Override setting in Simplify3D or a similar feature within your desired slicer software.

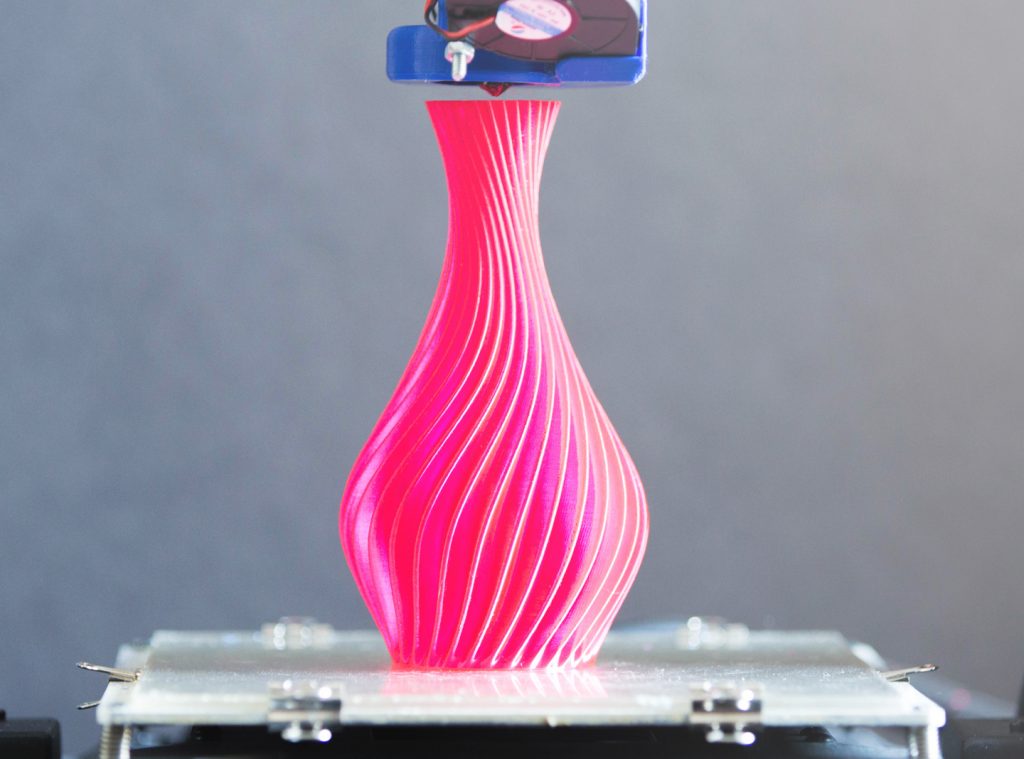
High Fan Speed: The faster the part is cooled, the better it will look when finished. This is often the best choice for vanity prints such as masks, vases and other aesthetically pleasing designs. It will not offer the same level of durability as prints that set at room temperature, however the overall surface finish will be a drastic improvement.
The temperate tower on the left was printed at 100% fan with a 50mm blower fan and the Dii Cooler, where the tower on the right was printed using the low powered stock fan. The higher powered fan causes the plastic to set quickly, which prevents the bridges from sagging and overhangs from warping at the edges.
PETG Settings
Printing a different filament is all about finding the right balance of settings. While there is a small learning curve, it’s a considerably better choice for most applications. There is no getting around the need to experiment, but the following should work as guidelines when building your own configurations.
| Setting Name | Setting Value |
|---|---|
| Print Speed | Use a slow speed for the first layer to ensure proper adhesion to the build plate. This should generally be around 25% of your normal print speed. Start with 40 mm/s as the base speed and increase this gradually until you find the perfect speed for your printer. Print Speed (Layer 1): 10 mm/s Print Speed (Layer 2+): 40 mm/s |
| Print Temperature | The print temperature will affect the object’s appearance and durability. The recommend temperatures below are median values, tune as needed. More heat to the extruder will increase the flow of plastic (and increase stringing), where 245C is a good starting point. Print Temperature: 245C |
| Bed Temperature | Bed Temperature: 85C |
| Retraction Distance | PETG filament is prone to stringing, where the proper retraction distance will help to minimize this. Start with these settings and tune as needed. Increase if stringing is present, decrease if you experience clogs. Retraction Distance (Bowden – Stock): 6.0 mm Retraction Distance (Bowden – All Metal): 3.5 mm Retraction Distance (Direct Drive- Stock): 2.0 mm Retraction Distance (Direct Drive- All Metal): 1.0 mm |
| Retraction Speed | |
| Fan Speed | Make sure the first layer is set to 0% to ensure proper adhesion. From layer 2 and on, choose the fan speed based on the purpose of the part. Lower fan speeds for strength and higher fan speeds for aesthetics. The “Bridge Fan Speed Override” is essential for good bridges. Fan Speed (Layer 1): 0% Fan Speed (Layer 2+): See Details Above Bridging Fan Speed Override: 100% |
| First Layer | Use Skirt: Enabled Skirt Outlines: 2 First Layer Height: 90% First Layer Width: 100% |
PETG has been a difficult filament for me… and your post is the first that covers a lot of in-depth content. I have applied all your suggestions, especially speed. I look forward to printing better with PETG
I’m glad to hear that it helped, appreciate the feedback as well. Definitely let me know how it goes for you, PETG is amazing to use once you get it printing correctly!
I have had issues with PETG as well.
My findings: You need to add around 0.1mm extra distance compared to PLA. I do this in the preamble GCODE.
Have yet to find optimal printing surface. Now I use glass with water/PVA glue mix. Does not stick hard. And I do get warping sometimes. Will have to put the sides/top on the printer to try again. Some say an enclosure helps. Or use brim/raft. I often use both got ABS (which I like a lot). Working on my enclosure, since I have seen splits mid-part on my HIPS prints.
Had lots of stringing issues. Even where head does not move.
Using an extrusion test from thingiverse, I am down to around 80% extrusion. This combined with the 0.1mm extra bed distance has removed much of the random stringing (which is caused by the nozzle going into the plastic, which sticks to the side of the nozzle, and causing stringing that way). Still get retract/move stringing. Coast would likely be an option here (stop extruding shortly before retract).
I had heeeeaps of trouble swapping to petg last week.
Here’s what I did to get it working.
1- start with abs profile and work from there
2- bed 50deg, nozzle 238-245
3- no fan on first layer, then full fan
4- adhesion , I just use a glue stick and it’s good
5- first layer 0.25mm, following layers 0.2mm
6- first layer nice and slow to start with. Start at 15mm/sec, then work up.
7- CHECK THE FILAMENT DIAMETER. under extrusion stops the print from sticking.
8- put lots of lines on the skirt to get the shit off the nozzle, and give time to tune before the print starts. until you’re tuned enough to start clean. A messy nozzle will wreck your print.
9- slow it all down to start. Like 20-30mm/second, then work up.
10- retraction 5 to 7mm, speed 45mm/sec
11- nice quick travels. Like 100mm/second
I’m getting pretty good prints with the above. Still working on it, but I was ready to throw the petg in the bin until I got to this point.
Now, I’m a convert. Strong prints that can be put into service as mechanical parts. Not just visual prototypes.
Also I’m printing on a genuine prusa with no enclosure. Just room temperature.
Stick with it, petg isn’t a scam like I thought. It is as good as they say, just a tricky to tune.
Oh also if you’re using the current version of cura, 3.1, uninstall it and get 3.04.
3.1 has a bug that sets all nozzle temps in the g-code to 210 regardless of your settings.
I have no problem with Cura 3.1. It sets the temps I ask for every time. I’m slowly tuning my PETG. Finding I can use very little fan if I want a strong part. Currently printing at 230 and 3% fan. Much more fan and the surface is very matt and the parts have little strength.
PETG printed with low/no fan will be exceptionally strong. I have printed PETG temperature towers that were impossible to break by hand. I believe the matte color however comes more from the temperature you are using though. The parts I printed at 230C were a matte color and very brittle, but the parts done at 245C were translucent and nearly indestructible (both at 100% fan). I have found that 25-50% fan offers a good balance of strength/aesthetic quality, but you can go 0% for high durability or 100% fan for visual pieces.
Thanks Cameron. Struggled with this stuff for about 6 hours. Tried your settings and it worked the first time! I also have a genuine Prusa with no enclosure. I’m using Simplify3D with your settings and getting great results. Kudos.
Have You done any bridging with PETG and these settings?
I’m trying to realise bridging but can’t get even a small bridge to print succesfully, just a lot of sagging resulting in a terrible moon landscape as a surface.
Printing something like this: https://www.thingiverse.com/thing:1025471 results in a drama (as no supports can be used).
Using home made MK2 with esun PETG (acording to the packaging printable between 230 and 250 degrees).
I’m printing on glass with hairspray which works superb.
Using E3d V6 and a direct drive extruder.
Printing normal parts with the following settings in S3D with no problems at all:
– 235 degrees
– 40mm/s
– Nozzle 0.4, layer width 0.4mm (and also tried 0.48mm)
– first layer at 60% speed, height 0.2mm (same as PLA) no stringing, width 100% without layerfan
– other layers at 0.25 height, layerfan 68%
– retraction 1.8mm at 40mm/s (to fast will grind the filament)
Tried quite a few settings for bridging, going slow with 80% flow making the filament stretch, or fast with 80% flow using the layerfan override at 100% for bridges. but still no respectable result with overhangs/bridges.
any good suggestions?
Looking at your part, it looks like you may be confusing overhangs with bridging? I cold be wrong.
The biggest breakthrough I had with both was changing to Slic3r Prusa edition.
My overhangs are killer an bridging (stretching between 2 points) works great too.
All I do now is select default settings for each material, enable “detect bridging” and everything just works.
The reason I changed from Cura to Slic3r was because of some surface defects I was getting in Cura.
Guys in another forum explained how to fix it, but by that time I was already hooked on Slic3r.
If you like I can try to print that fan part using the esun transparent orange petg, stock settings and see what comes out.
As someone who has NO IDEA what they are doing with PETG, can I just say THANK YOU to people like you who help me avoid at least some of these headaches!!!
I’m glad to hear that the information helped! PETG definitely takes a bit more finesse than PLA but it’s a fantastic material once you get it dialed in. The strength and flexibility alone make it one of my favorite filaments, not to mention the semi-transparent brands look amazing.
Just want to say thanks as well I just have just started using PETG and results were not so well until I read your how to guide. Prints look so much better now. Thank you Brett!!!
Hey Chris,
I am very glad to hear that this has helped! It definitely took a lot of experimenting to figure it out, but the small changes make a world of difference when printing PETG. It’s a fantastic filament overall so I am just glad I can help others get the hang of using it.
Super new with Printing. You are getting me worried about my hardware of my Prusa 3. Do I have to worry about the liner, heck, do I even have a liner to worry about? Thanks for the great site. I am going to go home and print some more PETG.
Hi Kevin,
Do you have a Prusa MK3 or a Prusa i3? The former is the latest model that runs around $749 and the Prusa i3 is just a design utilized by a lot of 3D printers. If it is the MK3, you have the E3D V6 hotend which is perfect for printing PETG as they are made of all metal (no liner). If it is just a Prusa i3, you may want to check and find out what hotend is installed. You can still print PETG with a PTFE tube lining but it will deteriorate over time.
Thanks Brett,
I’ve been trying to find the right settings for months now (always gave up and returned to PLA) but after setting it exactly like you recommend it magically worked
I’m thrilled, have so many unused PETG and a long queue of prints
Thanks again!
Hi Ofir,
That is fantastic! I’m very glad to hear that this article helped get PETG printing correctly for you. It can definitely be a headache figuring things out, but once it works right it is a wonderful material to use.
Just a quick note to let you know this article is still helping. I’m currently trying to get my Ender 3 to print PETG and you have helped me a BUNCH. I’ve installed a Micro Swiss all metal and am having good luck with it, so far no jams or plugs (knock on wood). With the help you have provided here I am well on my way to much better prints. As you stated in the beginning there is much confusing information out there for PETG but you have provided information that is helping me greatly because you take the time to explain the WHYs of the various settings you recommend.
THANK YOU!!!
Hi Glenn,
Thanks so much for the feedback! I am very glad to hear that this still serves as a decent guide for printing with PETG. It was written a couple years ago with my Maker Select in mind, which uses a Direct Drive hotend and has some slight differences from Bowden hotend settings (like what the Ender-3 has) but the large majority is applicable to both types.
The main difference between Direct Drive and Bowden is the retraction settings, where 0.5 to 1.0 distance is good for DD, but 3.5 to 4.0mm distance seems to be the sweet spot for Bowden. Otherwise, everything should be about the same. I also use the Micro Swiss All Metal Hotend on my Ender-3 and like you mentioned, it has been absolutely great to me. The drop-in install makes it super easy to setup, and it has performed flawlessly as well.
Can someone give me settings for a monoprice maker select plus. Thanks
Wow and to think I almost stopped trying to print PETG. Your instructions are spot on.
I have found the biggest issue for printing PETG is the build plate to Extruder height.
I am running an Ender 3 Pro and after leveling the build plate, I set my distance at .2.
I use feeler gauges to set. I started at .3 but no adhesion.
Thank you very much for a great jump off point